
Introduction
Last spring, I finally looked up at my kitchen pendant lights — really looked at them — and almost fell off the step stool. A thick, yellowish film had coated the glass shades. It wasn’t dust. It was cooking grease that had been silently accumulating every time I fried chicken, sautéed garlic, or boiled pasta. Kitchen light fixtures sit directly above the action, which makes them one of the most consistently neglected — yet most grease-covered — surfaces in any home. The good news? Cleaning them is easier than you’d expect, and the results are genuinely satisfying. This guide walks you through every step, every method, and every product you need to get your kitchen lights looking brand new again.
Why Kitchen Light Fixtures Get So Greasy — And Why It Matters
Every time you cook, tiny airborne particles of oil and moisture rise with the heat from your stove and settle on every nearby surface. Your light fixtures, sitting directly above the cooking zone, catch more of this than almost anything else in the room. Over time, that invisible oily film attracts dust, which sticks to the grease, which traps more dust — creating a thick, grimy buildup that dims your lighting, creates unpleasant odors when the bulbs heat up, and eventually damages the finish of the fixture itself. Regular degreasing doesn’t just make your kitchen look cleaner — it actually protects your fixtures and keeps your kitchen smelling fresh.
Step 1: Always Turn Off the Power First — Safety Before Anything

Before you touch a single light fixture, the power must be off. Flip the light switch and, for extra safety, also switch off the circuit breaker that controls that fixture. This takes thirty seconds and eliminates any risk of electrical shock while you’re cleaning with water and damp cloths. Once the power is off, wait at least ten to fifteen minutes for the bulbs and fixture to cool down completely. Cleaning a warm glass globe with a cold wet cloth can cause it to crack from the temperature change. Safety first — always. No clean light fixture is worth an injury or a trip to the emergency room.
Step 2: Gather Your Cleaning Supplies Before You Start
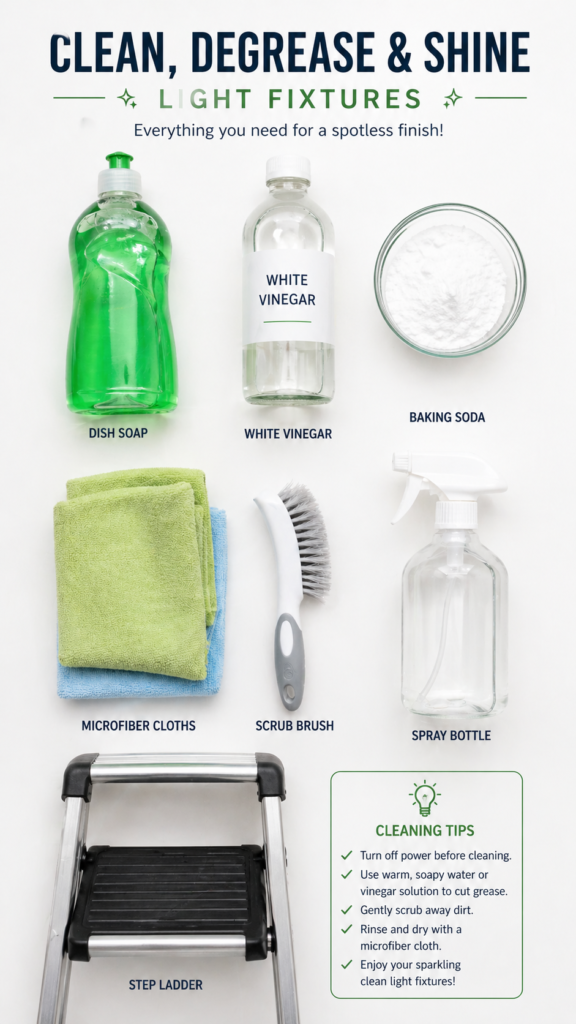
Getting everything together before you climb up that ladder saves time and prevents you from having to come down mid-task. For most greasy kitchen light fixtures you will need: a sturdy step ladder, microfiber cloths or soft lint-free rags, a mild dish soap like Dawn, warm water, white vinegar, baking soda, a gentle degreaser spray, a soft scrub brush or old toothbrush for detailed areas, a dry towel for buffing, and a small bucket or basin for soaking removable parts. Having it all at arm’s reach means a smoother, faster, and more complete cleaning job from start to finish.
Step 3: Remove the Glass Globes or Shades for a Deeper Clean
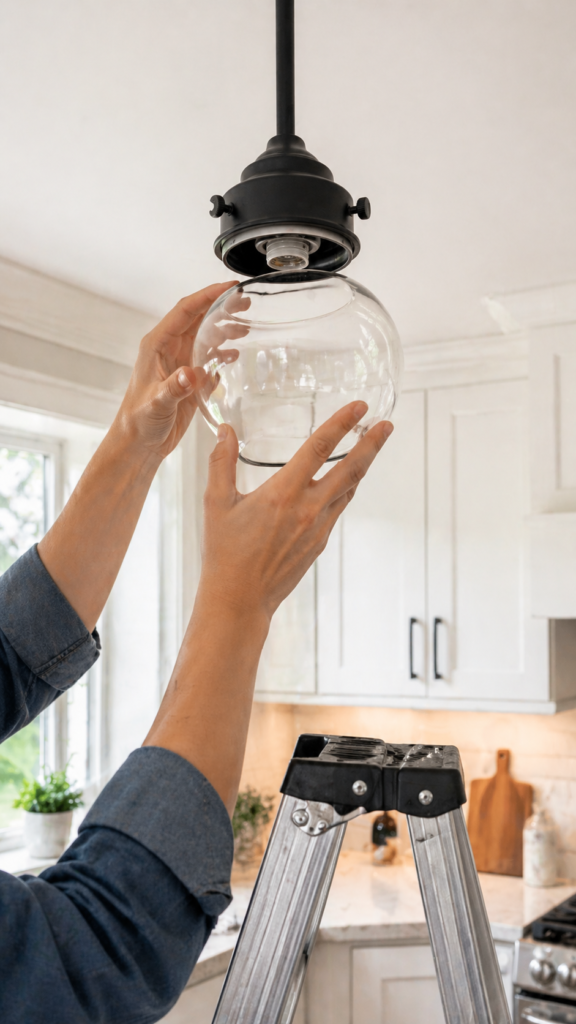
If your light fixture has a removable glass globe, dome, or shade — and most kitchen fixtures do — take it off before you clean. Most globes unscrew counterclockwise or release with a gentle twist. Handle them carefully to avoid chips or cracks, especially with vintage or delicate glass. Once removed, bring the globe to the sink and fill a basin with warm water and a generous squirt of dish soap. Place the globe in the soak for ten to fifteen minutes. This is the key step most people skip, and it’s the one that makes the biggest difference — a good soak loosens even the most stubborn baked-on grease with almost no scrubbing required.
Step 4: Soak and Scrub the Glass Globe in Soapy Water
After soaking for ten to fifteen minutes in warm soapy water, most of the grease will have loosened enough to wipe away with minimal effort. Use a soft sponge or microfiber cloth to gently scrub the inside and outside of the glass globe. For stubborn spots, sprinkle a little baking soda directly onto a damp sponge — its mild abrasive texture provides just enough scrubbing power to lift caked-on grease without scratching the glass. If grease remains in any tight angles or seams, use an old toothbrush to get in there. Rinse thoroughly with clean warm water and dry completely with a lint-free cloth before reattaching.
Step 5: Use Dish Soap and Warm Water for Light to Moderate Grease
For light to moderate grease buildup — the kind that accumulates in just a few weeks — good old dish soap and warm water is genuinely all you need. Dampen a soft microfiber cloth with warm water, add a teaspoon of dish soap, and gently wipe the fixture’s surface in circular motions. Dawn dish soap is a particularly effective choice because it is specifically formulated to cut through cooking oils and grease without damaging most fixture finishes. Always wring your cloth out well before wiping — you want it damp, not dripping, to avoid moisture getting into any electrical components on the fixture body.
Step 6: Make a DIY Vinegar and Baking Soda Degreaser for Stubborn Buildup

When dish soap alone isn’t cutting through the grime, a homemade degreaser made from pantry staples is your next move — and it works surprisingly well. Combine one cup of white vinegar, one cup of hot water, and one tablespoon of baking soda, then add a few drops of lemon or orange essential oil for a fresh scent. Mix it in a bowl rather than a spray bottle to avoid a fizzy overflow. Apply the solution to greasy surfaces with a cloth, let it sit for five to ten minutes, then scrub and wipe clean. The acidity of the vinegar breaks down grease at a molecular level while the baking soda provides gentle scrubbing action.
Step 7: Apply a Commercial Degreaser for Heavy-Duty Grease
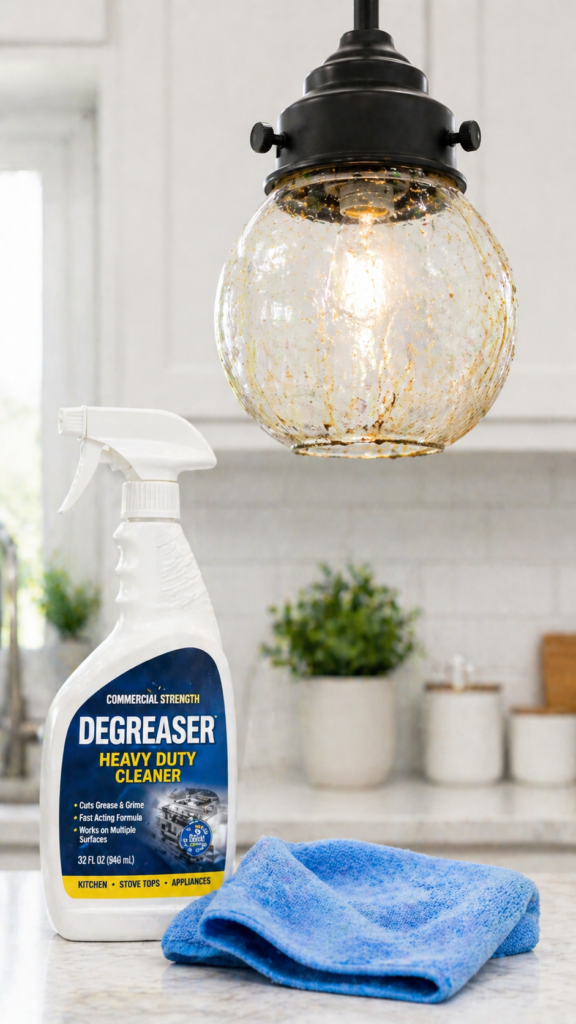
For fixtures that haven’t been cleaned in a long time — or those with thick, dark, baked-on grease that home remedies can’t fully tackle — a commercial kitchen degreaser is the right tool for the job. Cleaning experts consistently recommend Simple Green All-Purpose Cleaner as the best budget option, Krud Kutter Original for heavy-duty grease, and Puracy Natural Multi-Surface Cleaner for those who prefer plant-based formulas. Apply the degreaser to a cloth rather than spraying directly onto the fixture to avoid any risk of overspray near electrical components. Let the product dwell for five to ten minutes, then wipe clean, rinse with a damp cloth, and buff dry.
Step 8: Clean the Fixture Body — Don’t Just Focus on the Glass
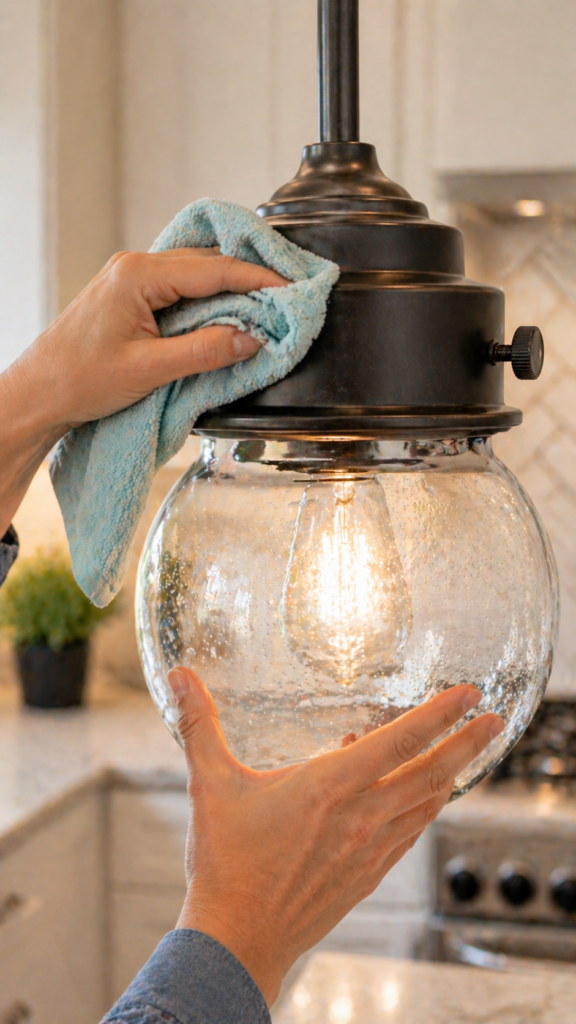
Most people clean the glass globe and call it done, completely forgetting the metal or ceramic fixture body that holds everything together. This is where grease films build up into a sticky, dust-collecting layer that can discolor finishes and eventually cause permanent damage. Use a damp cloth with a small amount of dish soap to wipe down the entire fixture body — the base, the arms, the socket cover, and any decorative details. For brass or bronze fixtures, use a degreaser-dampened cloth and follow with a dry buff to restore shine. For painted or matte-finish fixtures, stick with mild soap and water only to avoid stripping the finish.
Step 9: Clean the Light Bulbs Too — They Collect Grease as Well
Here’s a step almost nobody thinks about: the bulbs themselves get greasy too. Kitchen light bulbs collect the same airborne oil and dust film as the fixtures, and a dirty bulb can actually reduce the brightness of your light significantly — sometimes by as much as twenty percent over time. Once the power is off and the bulbs are cool, wipe each bulb gently with a barely damp microfiber cloth. For any greasy residue, a tiny amount of dish soap on the cloth works well. Dry the bulb completely before replacing it. Never clean a warm bulb and never spray any liquid directly onto it. Clean bulbs genuinely do shine noticeably brighter — it’s one of those improvements you can see immediately.
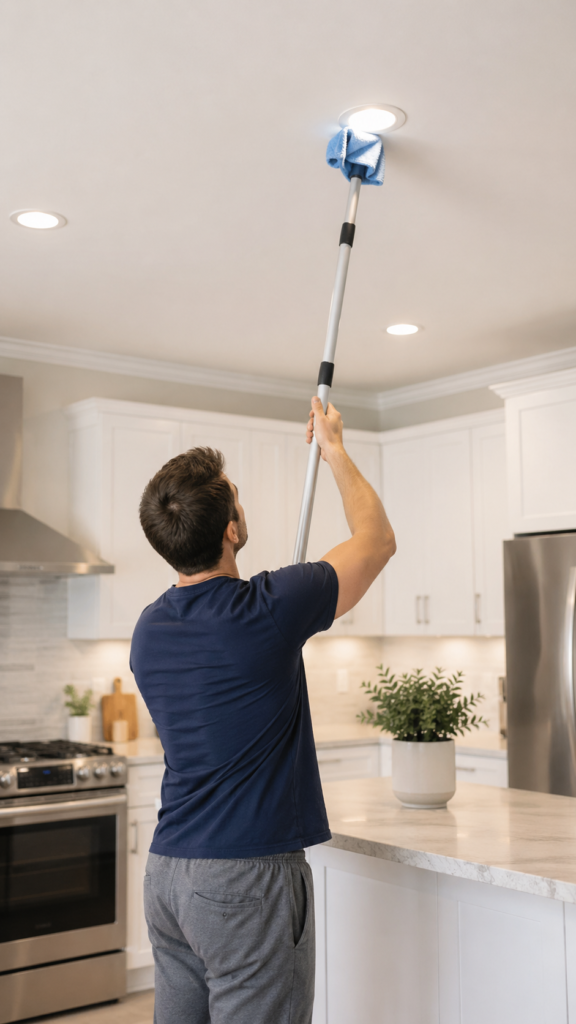
Step 10: Tackle Recessed Lights and Flush Mounts Without Removing Them
Recessed lights and flush-mount ceiling fixtures can be trickier to clean because they sit close to the ceiling and aren’t always designed for easy disassembly. For these, turn off the power, let everything cool, and use a soft microfiber cloth slightly dampened with your degreaser solution to wipe the visible rim, trim, and any glass cover. For the interior of a recessed light, use a dry or barely damp cloth to gently wipe the reflector cone — never introduce too much moisture near the socket. A can of compressed air can help dislodge dust from hard-to-reach interior areas before you wipe. Work carefully, be gentle, and dry everything completely.
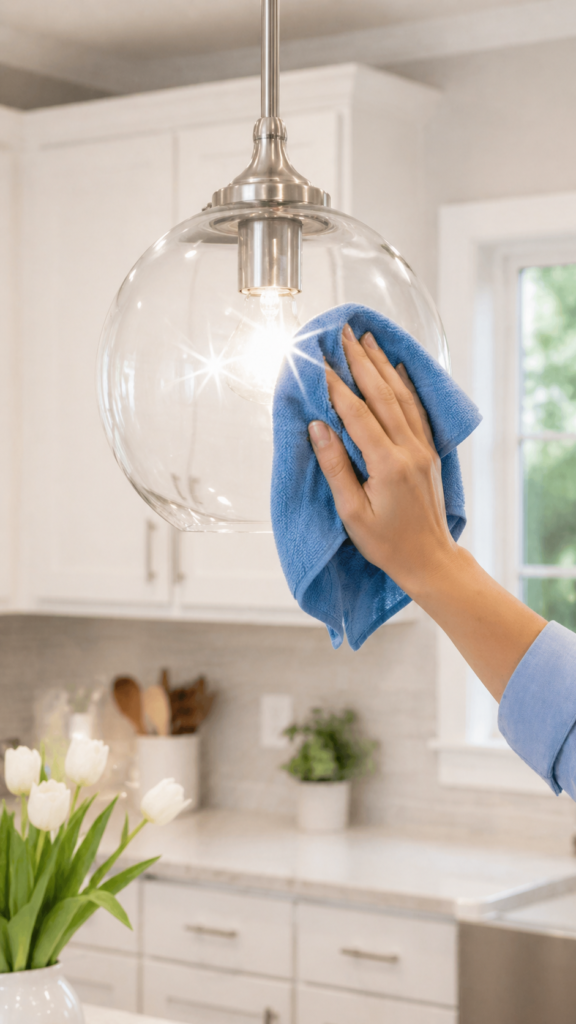
Step 11: Polish Glass Fixtures With Vinegar and Windex for a Streak-Free Shine
Once the grease is fully removed, the final step is polishing your glass to a streak-free, crystal-clear finish. After rinsing and drying, spray a small amount of Windex onto a lint-free cloth — never directly onto the fixture — and buff the glass in gentle circular motions. Alternatively, a solution of equal parts white vinegar and water on a microfiber cloth delivers a completely streak-free result with no commercial product needed. This final polishing step is what separates a clean fixture from a truly sparkling one. You’ll be amazed at how much brighter your kitchen feels when the light shines through perfectly clean, clear glass without that hazy grease film dulling everything.
Step 12: How to Clean Different Types of Kitchen Light Fixtures
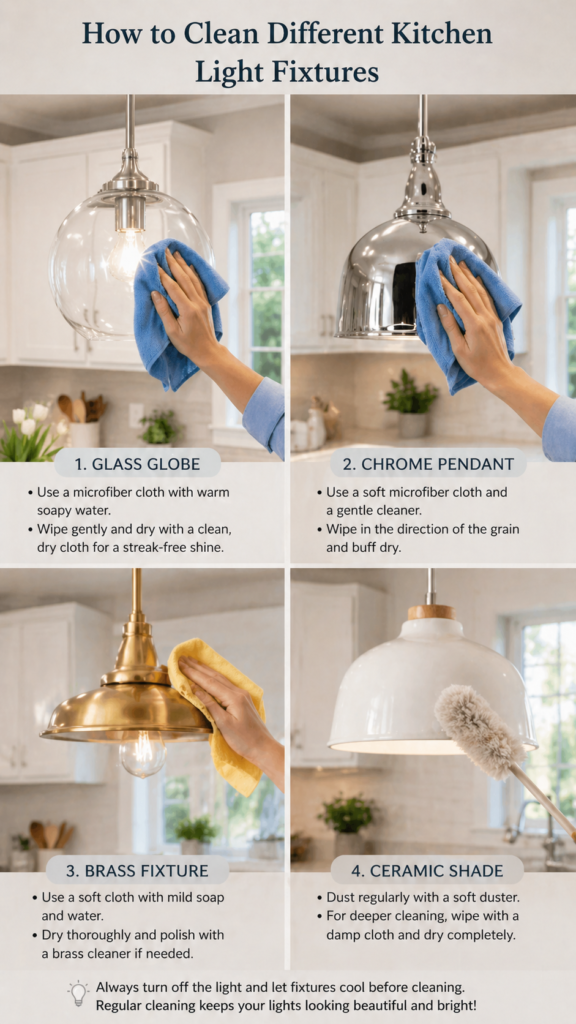
Different fixture materials require different cleaning approaches, and using the wrong method can damage the finish permanently. For glass globes and shades: soak in soapy water, scrub gently, finish with glass cleaner. For chrome and stainless steel: dish soap and warm water followed by a dry buff — avoid abrasive scrubbers. For brass and bronze: a commercial brass cleaner or gentle degreaser cloth followed by polishing with a soft dry cloth restores the warm glow. For painted metal fixtures: mild dish soap and water only — degreasers can strip painted surfaces and cause streaking. For ceramic fixtures: warm soapy water and a soft cloth, avoiding any acidic cleaners like vinegar that can affect the glaze.
Step 13: How Often Should You Clean Kitchen Light Fixtures?

The honest answer is: more often than you probably are right now. Kitchen light fixtures collect grease faster than any other fixture in your home because of their position directly above the cooking zone. For kitchens where cooking happens daily — especially frying, sautéing, or wok cooking — a quick wipe-down every four to six weeks prevents heavy buildup and makes each cleaning session fast and easy. A full deep clean, including removing and soaking the glass, should happen at minimum every three months. If you notice your kitchen lights looking dimmer than usual, or you detect an odd smell when the lights are on, that’s your fixture telling you it’s overdue for a clean.
Step 14: Prevent Grease Buildup Between Cleanings With These Simple Habits

The best degreasing session is the one you barely have to do — because you stayed on top of it between deep cleans. A few simple habits dramatically reduce how much grease your fixtures collect. Use your range hood fan every single time you cook, even for quick tasks — it captures the majority of airborne grease before it can settle on your fixtures. Give your light fixtures a quick dry dust with a microfiber cloth every couple of weeks to remove dust before it bonds with any thin grease film. Wipe them down lightly with a vinegar-water solution monthly. These micro-tasks take under five minutes total and mean your deep-clean sessions become genuinely quick and easy rather than an exhausting half-day project.
Conclusion
Greasy kitchen light fixtures are one of those sneaky household problems that build up so slowly you barely notice — until one day you look up and realize the damage. But here’s the truth: degreasing your kitchen light fixtures is one of the most satisfying cleaning projects you can do. The before and after is dramatic. Your kitchen instantly looks brighter, fresher, and more inviting — and your lights genuinely perform better. Start with the basics: turn off the power, remove the glass, soak it, and wipe everything down. Build a simple monthly routine to stay ahead of the buildup. Your kitchen light fixtures will thank you, your nose will thank you, and every guest who sits at your kitchen table will notice without knowing exactly why your kitchen just feels cleaner and brighter than before.