
Learning how to make a deco mesh wreath step by step completely transformed my front doThe first deco mesh wreath I ever made was, charitably speaking, a disaster.
I had purchased a roll of sparkly red mesh, watched a three-minute tutorial on my phone, and assumed the rest would follow naturally. It did not. What emerged after ninety minutes of frustrated twisting looked nothing like the lush, full wreaths I had seen online. The loops were uneven. The frame showed through in patches. The whole thing listed to one side like it was exhausted.
What that first attempt taught me — and what most guides skip entirely — is that deco mesh wreaths look deceptively simple but depend on a handful of specific techniques that are not obvious until someone explains them clearly. Loop tension, frame attachment method, the order in which you add embellishments, the way you fluff after hanging — each of these details separates a wreath that looks handmade in the best sense from one that looks homemade in the frustrating sense.
This guide covers the complete technique from scratch, including the exact mistakes beginners make and how to avoid them, followed by 20 creative wreath ideas with specific material and construction notes for each.
What Makes Deco Mesh the Right Material for Wreaths
Before covering technique, it helps to understand why deco mesh specifically works so well for wreaths — because the material properties directly inform how you handle it.
Deco mesh is a woven polypropylene fabric with an open lattice structure. That structure is what gives it volume: when gathered into loops, the mesh holds its shape without being stiff, creating a naturally full, dimensional appearance that flat fabric cannot replicate. The open weave also makes it weather-resistant — rain passes through rather than saturating it, and wind moves it without destroying the loops the way it would a fabric bow.
Standard deco mesh rolls are 10 inches wide and approximately 10 yards long. That width is important: it determines loop fullness. Wider cuts create fluffier loops; narrower cuts create a tighter, more structured appearance. Some experienced makers cut rolls in half lengthwise for a delicate effect; others layer two widths together for maximum volume.
The metallic and burlap-style variants behave slightly differently. Metallic mesh is stiffer and holds a loop shape more firmly, which is forgiving for beginners. Burlap-style mesh is softer and drapes more naturally, which creates a beautiful effect but requires more careful loop formation to maintain roundness.
Complete Supply List With Buying Notes
Wire wreath frame: Available in 10-inch through 24-inch diameters. Frames with four rings (rather than three) produce a noticeably fuller wreath because you have more attachment points per row. For a front door, 16-inch to 20-inch is the most proportional range.
Deco mesh rolls: Budget one roll per color per wreath for a standard 16-inch frame. Fuller designs or larger frames require two rolls per color. Buy from craft stores rather than dollar stores if quality matters — cheaper mesh has a coarser weave that loses shape faster.
Pipe cleaners or floral wire: These are your attachment method for mesh loops. Pipe cleaners are easier to handle; floral wire holds tighter. Have at least 30 to 40 for a standard wreath.
Wired ribbon: The “wired” part is non-negotiable for wreaths. Unwired ribbon collapses and cannot hold a loop shape. Width matters: 2.5-inch wired ribbon makes generous loops; 1.5-inch ribbon is better for detail work and bow streamers.
Hot glue gun: Use a full-size gun, not a mini. Mini guns do not generate enough heat for reliable adhesion on polypropylene mesh. High-temperature setting works better than low for this material.
Wire cutters: Essential for cutting floral picks, trimming wire, and managing pipe cleaners cleanly. Kitchen scissors are not a substitute.
Embellishments: Floral picks, ornament balls, ribbon loops, decorative signs, pinecones, berry stems — these are assembled after the base mesh structure is complete, not during.
Wreath hanger: A door-rated wreath hanger (typically rated for 7 to 10 pounds) is safer than an over-door hook for a fully embellished wreath, which can weigh 3 to 5 pounds.
How to Make a Deco Mesh Wreath — Complete Step-by-Step Method
Step 1 — Set Up Your Frame Correctly
Lay your wire frame flat on a table with the hook or hanging point at the top. If your frame has multiple rings (outer, middle, inner), identify them before starting — you will rotate between them as you work around the frame.
One underappreciated setup step: squeeze the frame rings together with your hands before starting so they sit flat and even. Frames sometimes arrive slightly warped from packaging. A warped frame produces an oval wreath even when your loops are perfectly made.
Step 2 — Attach Your First Mesh Loop Without Cutting the Roll
This is the technique most beginners get wrong. Do not cut pieces of mesh in advance. Work directly from the roll.
Gather approximately 4 to 5 inches of mesh at the open end of the roll into a ruffled bundle — imagine you are gathering a handful of fabric rather than folding it flat. The gathered width should be about 3 to 4 inches across. Secure this bundle to the outer ring of your frame with a pipe cleaner twisted tightly at the base. The loop should stand upright and perpendicular to the frame, not lay flat against it.
Step 3 — Work in a Three-Ring Rotation
Move approximately 3 to 4 inches along the roll (do not cut — the mesh stays connected), gather the next loop, and attach it to the middle ring. Move another 3 to 4 inches and attach to the inner ring. This three-point rotation — outer, middle, inner — continues all the way around the frame and is the structural foundation of a full, round wreath.
The consistent spacing between attachment points is more important than the size of each individual loop. Uneven spacing is the primary cause of lumpy, asymmetrical wreaths.
Step 4 — Manage Your Color Rotation if Using Multiple Meshes
For a two-color wreath, complete one full rotation (outer-middle-inner) with color A, then one full rotation with color B, alternating all the way around. For three colors, one rotation per color before switching.
The temptation is to alternate every single loop — one red, one green, one red, one green. This creates a striped effect rather than a blended one. Full rotations per color create a more cohesive, layered appearance.
Step 5 — Evaluate Before Adding Ribbon
Once you have completed the mesh loops all the way around, hold the wreath up and look at it honestly from the front before touching anything else. Look for: flat spots where the frame shows through, areas where loops are leaning sideways instead of standing upright, and sections where the spacing is noticeably wider or narrower.
Fix these now, before adding ribbon — it is much easier to adjust loops when the wreath is not yet crowded with ribbon.
Step 6 — Add Wired Ribbon Loops
Cut wired ribbon into 10-inch to 12-inch segments. Fold each segment into a U-shape (not a full loop) and tuck the folded end approximately 2 inches into the mesh, securing it with a pipe cleaner twisted through the adjacent mesh loops. The ribbon should fan out from the insertion point in two wings.
Distribute ribbon loops evenly around the wreath — typically 10 to 14 loops for a 16-inch wreath — rather than clustering them in one area. Ribbon adds color, sheen, and texture simultaneously. It is the most efficient embellishment you can add.
Step 7 — Add Picks and Embellishments in Order of Size
Work from largest to smallest: large floral stems or picks first, then medium ornaments or branches, then small detail elements like berries or stars last. This order prevents small details from being buried under large elements added afterward.
For picks that will not stay secured by the mesh alone, use hot glue applied to the stem before tucking — not after. Gluing after placement means gluing through open mesh, which creates visible glue strings across the front of the wreath.
Step 8 — Hang Before Final Fluffing
This is the single most important finishing step, and the one most guides bury or omit entirely.
Hang the wreath on the door at its actual display height before doing any final adjustments. Gravity shifts the loops in ways that are impossible to predict on a table. What looks perfectly round and full lying flat will often show gaps, tilting, or compression in a specific section once hung. Fluff, spread, and rotate loops while the wreath is hanging — this is the only way to get the final shape right.
| Image | Product Title | Price | Action |
|---|---|---|---|
 |
Learn to Make Deco Mesh Wreaths – 14 Easy Step-by-Step Projects | $9.99 | Check Price |
 |
Deco Mesh Wreath: 8 Ways to Make Beautiful Wreaths | $12.99 | Check Price |
20 Stunning Deco Mesh Wreath Ideas for Every Season and Style
1. Classic Fall Harvest Wreath — Oranges, Golds and Rustic Charm
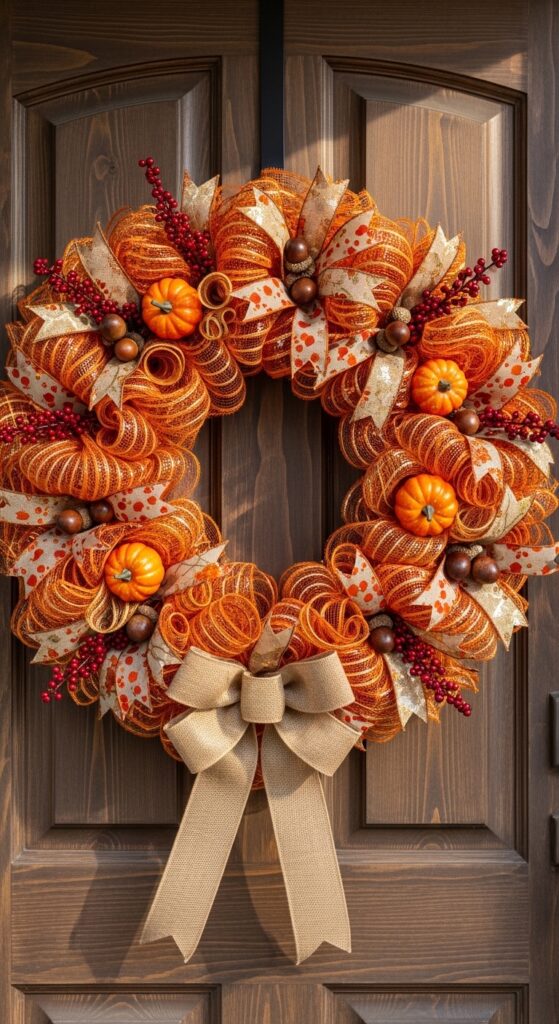
Colors: Burnt orange + shimmering gold mesh, alternating full rotations
Ribbon: Burlap wired ribbon in rust and cream, 2.5-inch width
Embellishments: Faux mini pumpkins, acorn picks, burgundy berry stems, maple leaf branches
Construction note: Use a 20-inch frame for this one — the warm, abundant aesthetic needs scale to read as intentional rather than cluttered. Add the pumpkin picks in a cluster off-center rather than evenly distributed for a more natural, gathered look.
2. Christmas Red and Green Glam Wreath — Festive, Full and Fabulous
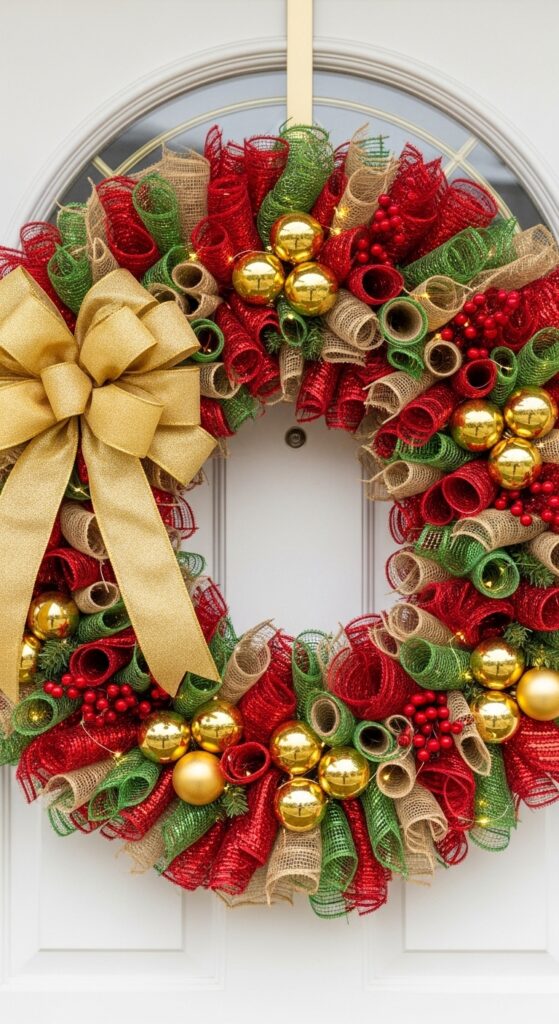
Colors: Red metallic mesh + forest green burlap-style mesh
Ribbon: Gold wired ribbon, 2.5-inch, formed into a layered bow at the top
Embellishments: Gold ornament ball clusters, red berry picks, gold tinsel curls
Construction note: Gold ornament balls cluster most effectively when wired together in groups of three before insertion. Single ornament balls look sparse; clusters look intentional. For fairy lights, use a battery pack tucked into the back mesh loops rather than running a cord visibly through the front.
3. Spring Pastel Floral Wreath — Soft, Sweet and Garden-Fresh
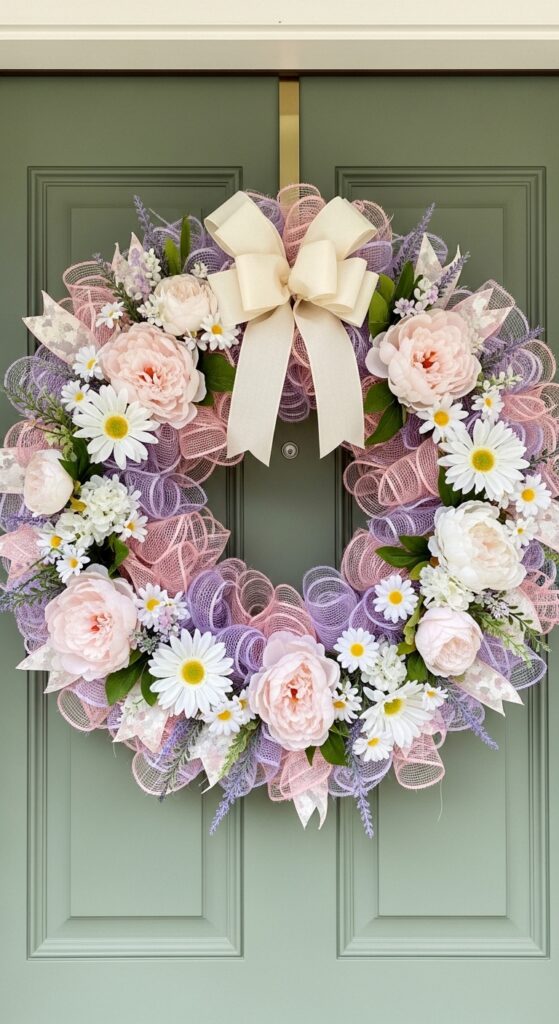
Colors: Blush pink base mesh + loops of white and mint green
Ribbon: Ivory satin wired ribbon, 1.5-inch width for a delicate finish
Embellishments: Faux peonies, white daisies, lavender sprigs, trailing greenery stems
Construction note: Florals on spring wreaths look best when inserted at slight angles rather than straight-on — angled stems create the appearance of natural growth rather than items plugged into a base. Vary stem heights by 1 to 2 inches for the same reason.
4. Patriotic Red, White and Blue Wreath — Bold, Proud and Festive
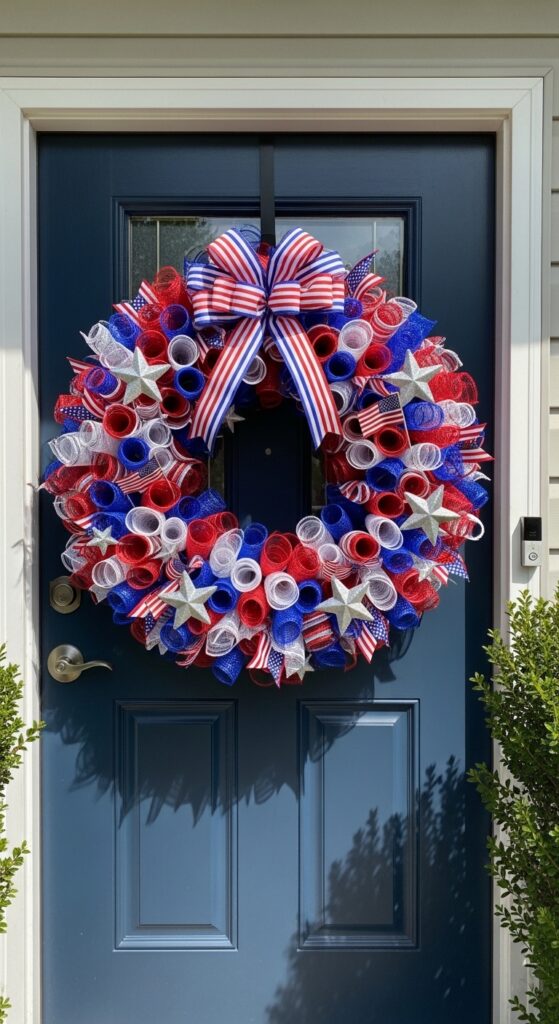
Colors: Red, white, and blue deco mesh in equal rotation — one full outer-middle-inner rotation per color
Ribbon: Patriotic stripe wired ribbon in a layered multi-loop bow
Embellishments: Silver star picks, small American flag accents, silver jingle bell clusters
Construction note: The temptation is to make this wreath very large for maximum impact, but a 16-inch to 18-inch frame reads more proportionally on a standard front door than an oversized one. The high-contrast colors carry the visual weight without needing extreme size.
5. Burlap and Cotton Farmhouse Wreath — Neutral, Warm and Timeless
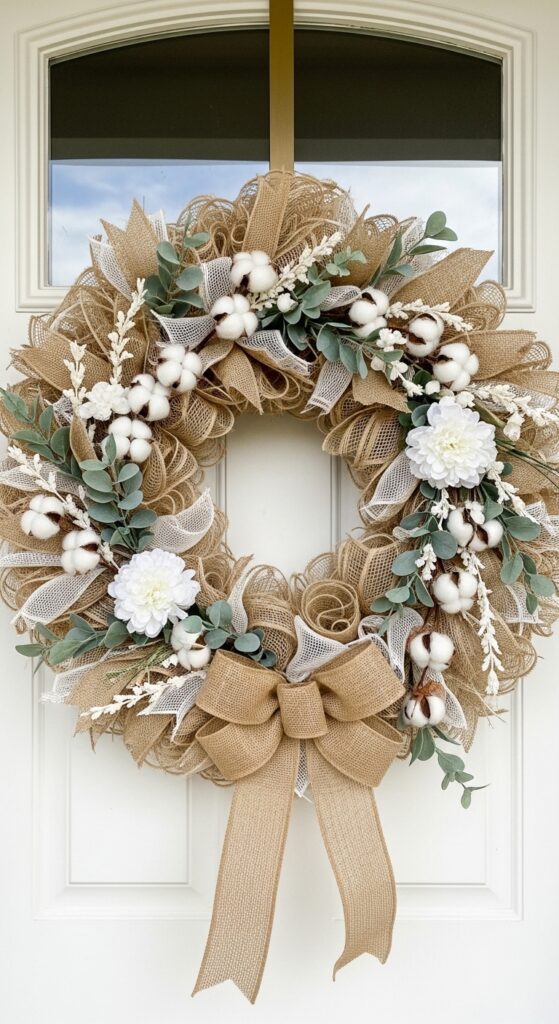
Colors: Natural burlap mesh + cream or ivory cotton mesh
Ribbon: Wide burlap wired ribbon in a generous double-loop bow
Embellishments: Dried cotton stems, eucalyptus sprigs, white faux blooms, small wood bead accent
Construction note: This wreath works year-round precisely because of its restraint — resist the urge to add too many elements. Five to seven embellishment picks maximum. The texture of the mesh and ribbon do the work; overcrowding undermines the clean, organic quality that makes farmhouse style effective.
6. Halloween Black and Orange Spooky Wreath — Fun, Bold and Creepy
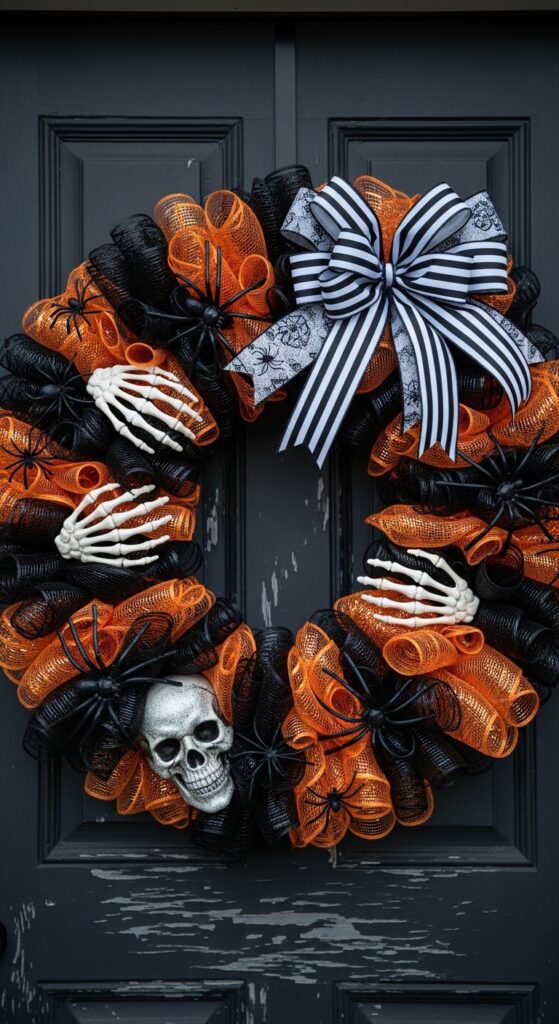
Colors: Matte black mesh alternating with metallic orange mesh
Ribbon: Black and white stripe wired ribbon bow for graphic contrast
Embellishments: Skeleton hand picks, miniature plastic spiders, glittery skull ornament, black wire curls
Construction note: Matte black mesh absorbs light rather than reflecting it, which makes the wreath recede slightly when hung. Counteract this by using metallic orange — not matte orange — for the alternating loops. The metallic sheen provides the brightness that keeps the wreath visually present on a dark or dark-colored door.
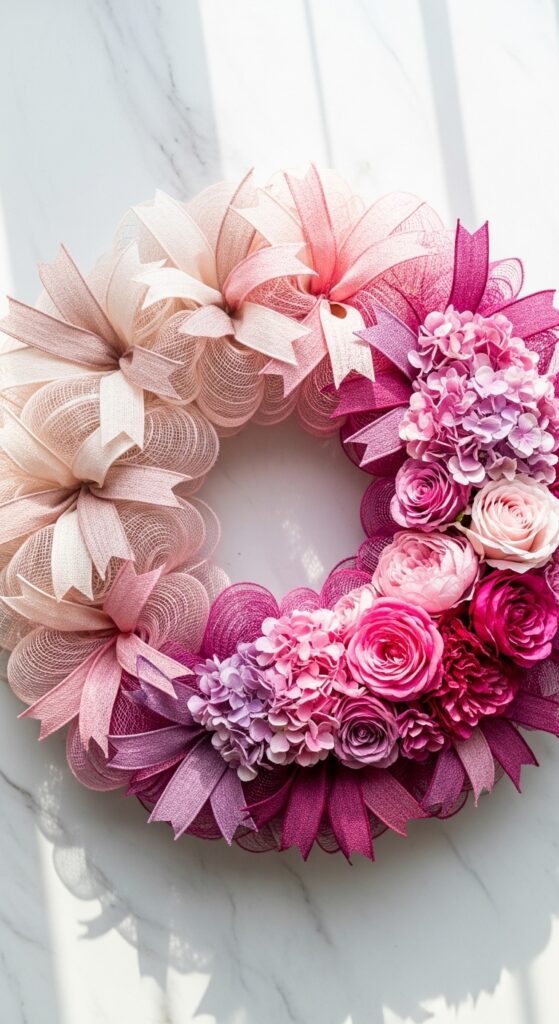
7. Valentine’s Day Pink and Red Love Wreath — Sweet, Romantic and Charming
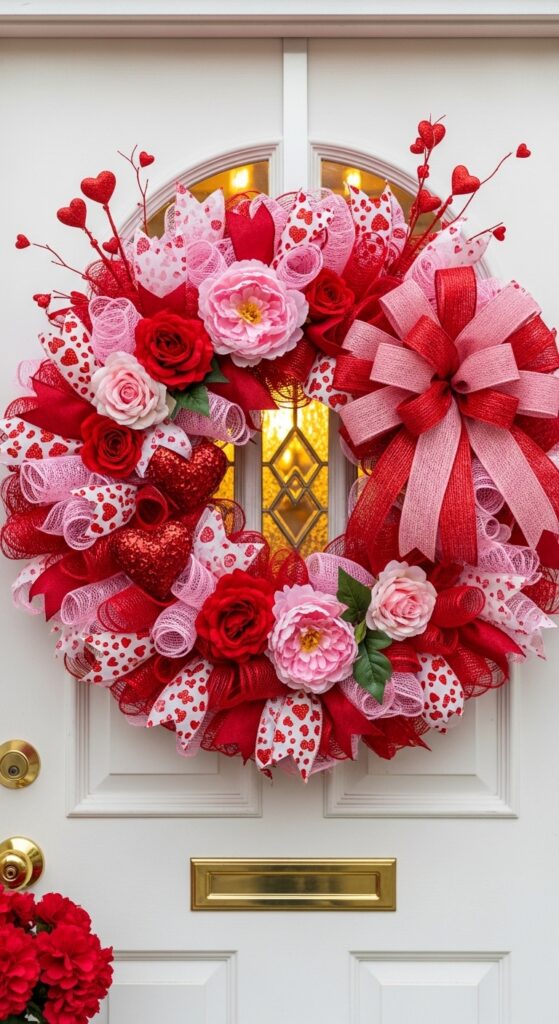
Colors: Soft pink mesh + deep rose + bright red, all three rotating
Ribbon: Red wired ribbon in a large layered bow with long streamers
Embellishments: Heart-shaped picks, faux red roses, pink peonies, pink satin ribbon loops
Construction note: Three shades of the same color family blend most naturally when the transition moves logically — light pink on the outer loops, medium rose on the middle, deeper red on the inner — rather than rotating randomly. This creates a subtle ombre effect within the color palette.
8. Sunflower Summer Wreath — Bright, Cheerful and Sunshine-Worthy
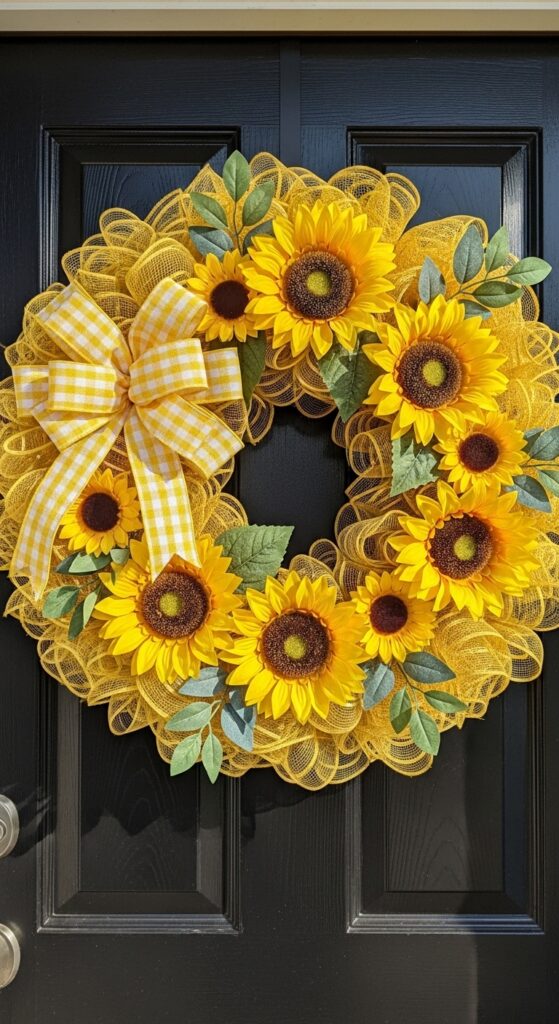
Colors: Golden yellow mesh base + accent loops of chocolate brown or teal
Ribbon: Yellow and white gingham wired ribbon, 2.5-inch
Embellishments: Five to seven large faux sunflowers, green leaf sprigs
Construction note: Odd numbers of sunflowers always look more natural than even numbers. Arrange them in a loose crescent (covering roughly 60% of the wreath face) rather than distributing them evenly around the circle. A full-circle arrangement of sunflowers looks flat; a crescent arrangement suggests abundance.
9. Thanksgiving Cornucopia Wreath — Rich, Abundant and Harvest-Beautiful

Colors: Deep rust orange + burgundy + forest green mesh rotating in three-color sequence
Ribbon: Plaid wired ribbon in rust, olive, and cream tones
Embellishments: Faux mini gourds, dried corn cob picks, crimson and amber maple leaf stems, gold-dusted pinecones
Construction note: Gold glitter spray on pinecones elevates this wreath from craft-store-looking to boutique-quality. Spray lightly and unevenly — all-over even coverage looks artificial; partial highlighting on the tips looks dimensional and deliberate.
10. Winter White and Silver Frosted Wreath — Elegant, Icy and Breathtaking
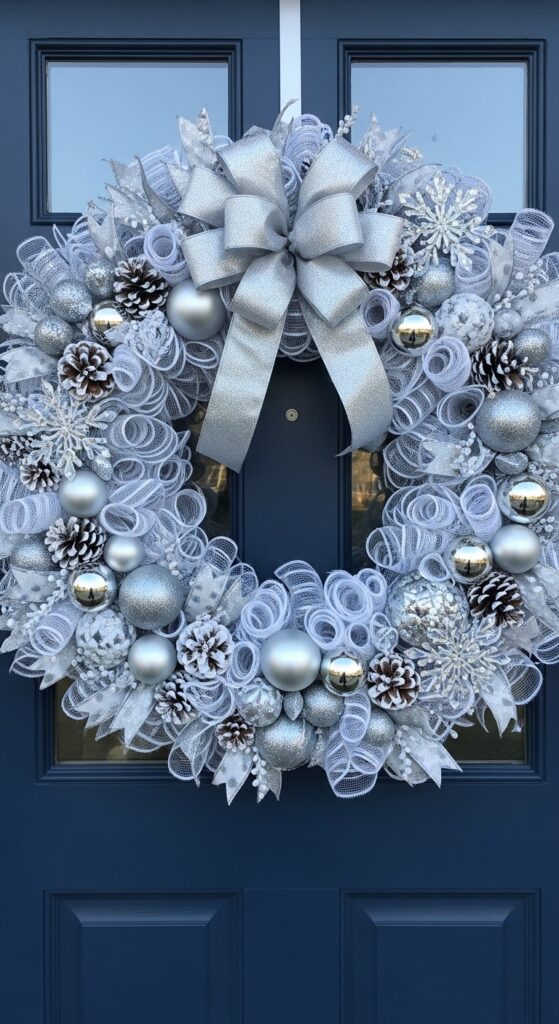
Colors: Pure white mesh + silver metallic + pale grey mesh
Ribbon: White and silver wired ribbon in a grand bow
Embellishments: Frosted pinecones, silver ornament balls, white feather picks, clear acrylic snowflake ornaments
Construction note: This wreath depends entirely on light-catching elements for its impact. Place it where it will receive direct porch light or winter afternoon sun — on a shaded, north-facing door it loses most of its visual effect. The snowflake ornaments should be the clear acrylic variety, not opaque white, to catch and scatter light.
11. St. Patrick’s Day Green and Gold Shamrock Wreath — Festive and Fun
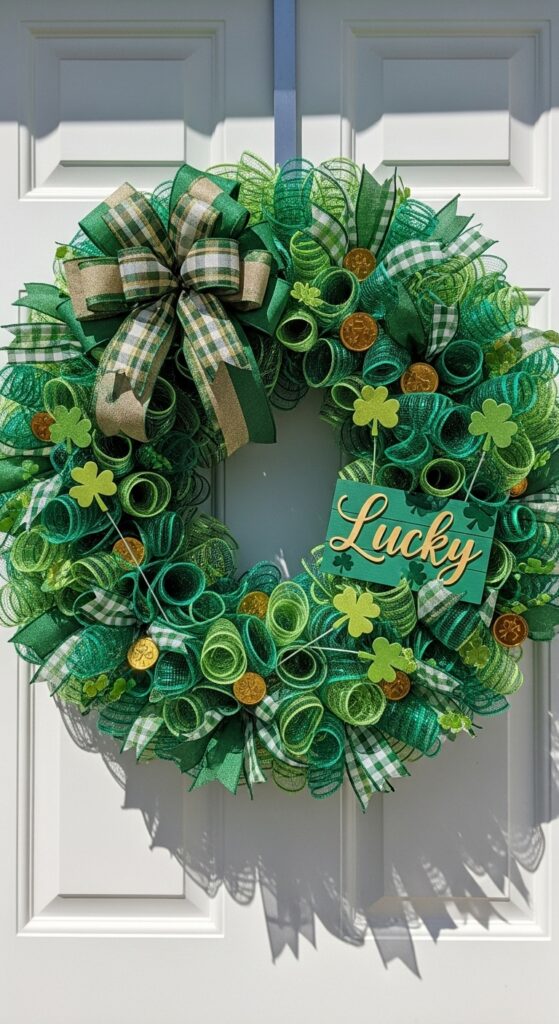
Colors: Kelly green + deep emerald mesh, alternating
Ribbon: Green and gold plaid wired ribbon in a large layered bow
Embellishments: Gold coin picks, shamrock floral stems, small “Lucky” sign, gold glitter ribbon loops
Construction note: The visual risk with an all-green wreath is that it reads as monochromatic from a distance. The gold elements — picks and ribbon — are structural to the design, not optional. Without them, the wreath blends into itself. Distribute gold elements throughout rather than concentrating them in one area.
12. Easter Pastel Egg Wreath — Whimsical, Colorful and Family-Friendly
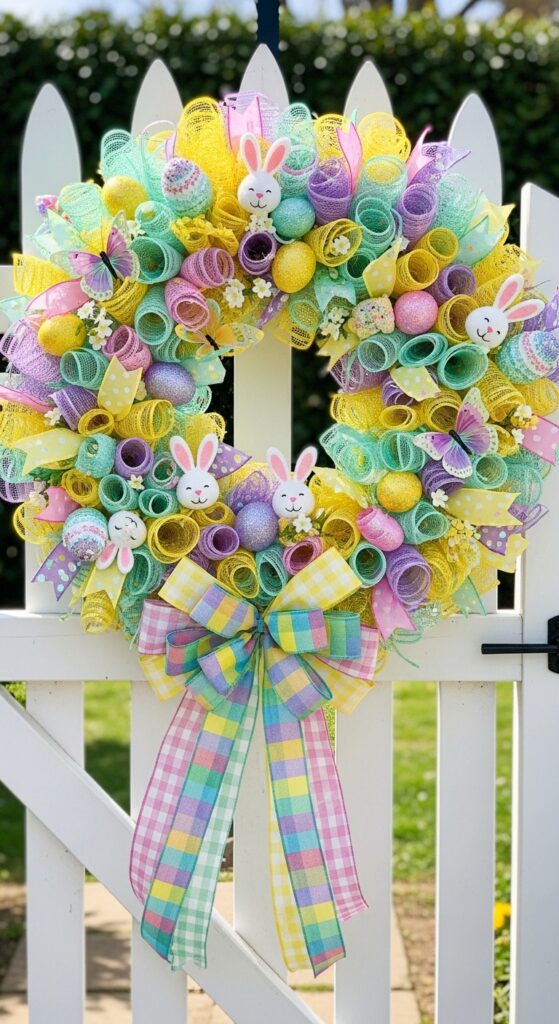
Colors: Pale yellow + mint green + lavender + baby pink mesh, rotating in sequence
Ribbon: White satin bow or pastel plaid wired ribbon
Embellishments: Pastel glitter egg ornaments, small bunny picks, faux butterfly stems
Construction note: The random rotation of four pastel colors creates a playful, tumbled effect rather than a striped one — but only if you genuinely randomize. Many makers unconsciously fall into a pattern. After completing the first pass around the frame, step back and check that no single color appears in a visible block of more than two or three consecutive loops.
13. Buffalo Check Plaid Wreath — Cozy, Rustic and Perfectly Timeless
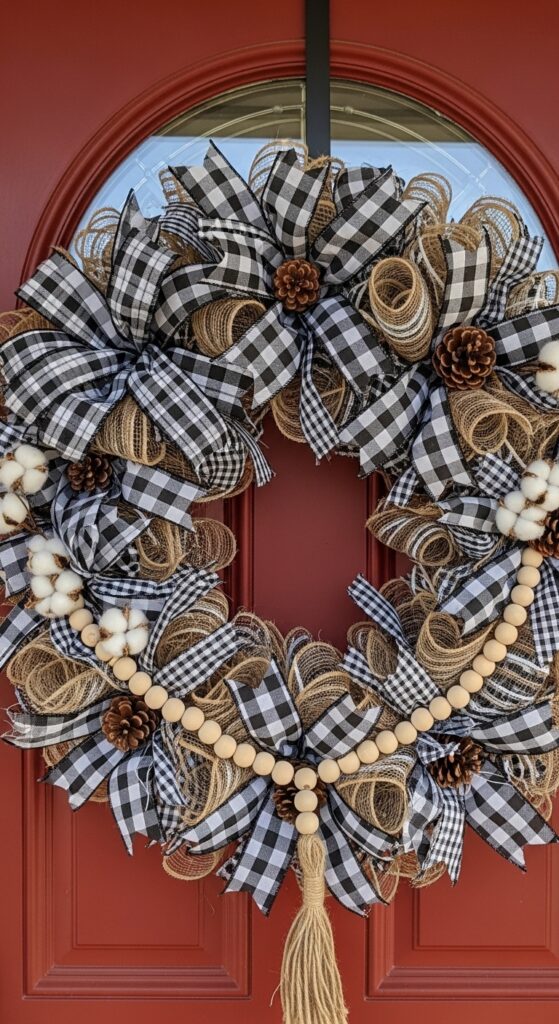
Colors: Neutral burlap mesh as the primary base
Ribbon: Buffalo check wired ribbon in black and white or red and black — this is the visual star, used in wide loops throughout the mesh
Embellishments: Wood bead garland loops, small pinecone picks, white cotton stems
Construction note: Unlike most wreaths where ribbon is a secondary layer, buffalo check ribbon is the primary design element here. Use wider loops (cut ribbon into 14-inch to 16-inch segments) and position them prominently at the front rather than tucking them deep into the mesh. The bold grid pattern needs to be visible to carry the design.
14. Ombre Gradient Wreath — Modern, Artistic and Show-Stopping
Colors: Three to four shades in one color family — for example, pale blush, dusty rose, medium rose, deep magenta — progressing around the frame
Ribbon: Tonal ribbon loops in the mid-range color of the gradient
Embellishments: Gradient florals in matching tones, no contrasting accent colors
Construction note: Plan the color zones before attaching a single loop. Divide your frame mentally into thirds or quarters and assign each zone a color. The transition zone between colors should be two to three loops wide, with loops from both colors mixed together — not a hard cutoff. Hard color breaks undermine the gradient effect entirely.
15. Lambs Ear and Eucalyptus Greenery Wreath — Lush, Fresh and Botanical
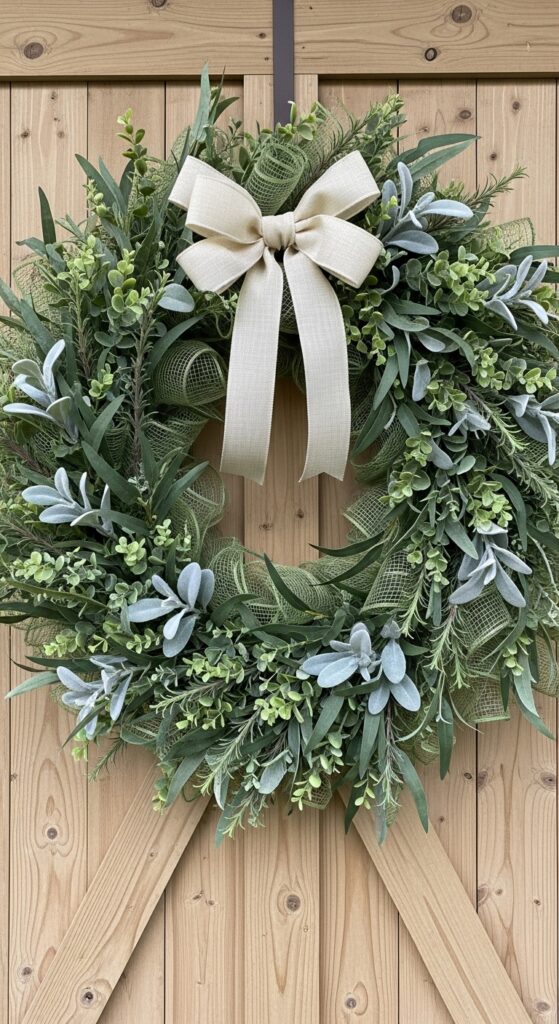
A greenery-forward deco mesh wreath using lambs ear and eucalyptus creates one of the most organic and genuinely beautiful wreaths imaginable. Use a soft sage green or pale silver mesh as your base. Layer in generous branches of faux eucalyptus, velvety lambs ear stems, and sprigs of rosemary or olive branches for a garden-gathered, effortlessly lush feel. Add a simple ivory or linen ribbColors: Soft sage green or pale silver-green mesh
Ribbon: Simple ivory or linen wired ribbon in a low-profile bow
Embellishments: Faux eucalyptus branches, velvety lambs ear stems, rosemary or olive sprigs
Construction note: The success of this wreath depends on generous, overflowing embellishment. The mesh is background only — the botanicals are the design. Use at least 12 to 15 individual stem picks distributed all the way around the wreath, not just at the top. Sparse greenery on this style looks unfinished; abundance is the point.
on bow. No bright colors, no ornaments — just beautiful shades of green, silver, and sage in an abundant, overflowing arrangement. Elegant year-round and perfect for farmhouse, coastal, and contemporary spaces. If you love this organic style, these upstairs loft ideas will inspire your whole home.
16. Mardi Gras Purple, Gold and Green Wreath — Bold, Festive and Carnival-Worthy

Colors: Deep royal purple + metallic gold + vivid green mesh in equal rotation
Ribbon: Purple and gold wired ribbon in a grand layered bow
Embellishments: Mardi Gras mask picks, gold bead garland, fleur-de-lis ornaments, jester hat picks
Construction note: This is the most embellishment-heavy style on this list — and intentionally so. The Mardi Gras aesthetic rewards excess. Layer picks generously, let gold bead garland drape loosely through the mesh rather than being tucked flat, and use a bow with multiple loops and long streamers. Restraint works against this particular design.
17. Nautical Rope and Blue Wreath — Coastal, Breezy and Beach-House Beautiful
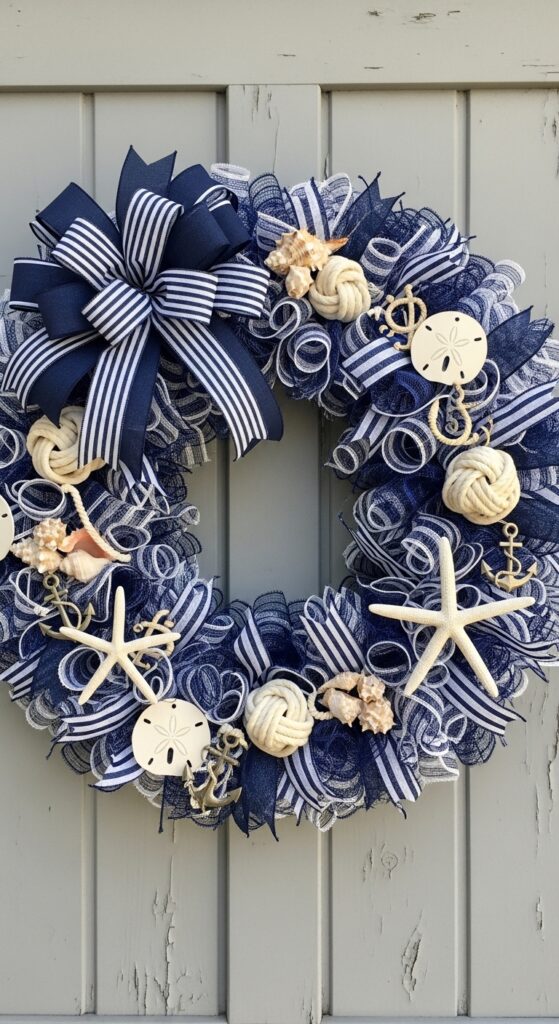
Colors: Navy blue and white striped mesh as the base — the stripe pattern itself carries the nautical reference
Ribbon: Navy and white striped wired ribbon bow, clean and simple
Embellishments: Rope knot picks, wooden starfish, sand dollar ornaments, anchor charms, natural shells
Construction note: Natural shells require a hot glue gun with high-temperature setting — standard craft glue does not bond reliably to shell surfaces. For shells heavier than a quarter, wrap thin floral wire around them before embedding in the mesh to prevent glue failure over time.
✨ More Home Decor Inspiration from AbodeMom
- → 17 Sliding Glass Door Covering Ideas to Transform Any Room
- → 16 Best IKEA Kids Playroom Ideas — Creating Magic on a Budget
- → 16 Cozy Old Mexican Home Decor Ideas
- → 17 Brilliant Bookshelf Styling Ideas — Turn Your Library into Art
- → 16 Wall Molding Ideas to Elevate Every Room
- → Upstairs Loft Ideas — Make the Most of Your Space
18. Black and White Elegant Modern Wreath — Graphic, Chic and Sophisticated
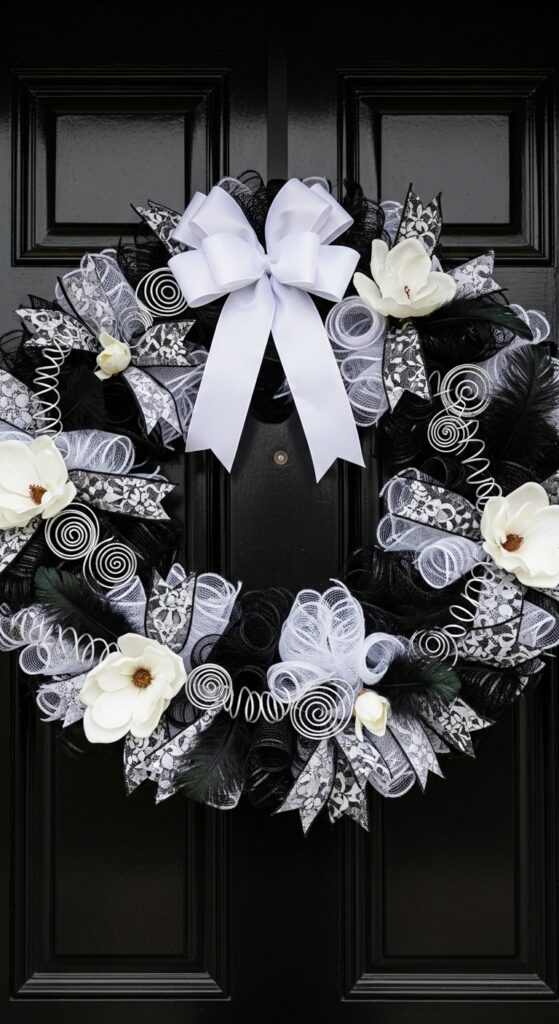
Colors: Matte black mesh + crisp white mesh, alternating
Ribbon: Black and white striped wired ribbon in a sculptural bow
Embellishments: White artificial magnolia flowers, black feather picks, silver wire ribbon curls
Construction note: The visual impact of this wreath is entirely dependent on the quality of the white mesh. Yellowed or off-white mesh reads as aged rather than crisp. Look for bright white mesh (not ivory, not cream) for the contrast to be as sharp as the design requires. On a black door, white picks up the porch light dramatically — very effective in evening.
19. Baby Shower or Gender Reveal Wreath — Sweet, Personal and Celebratory
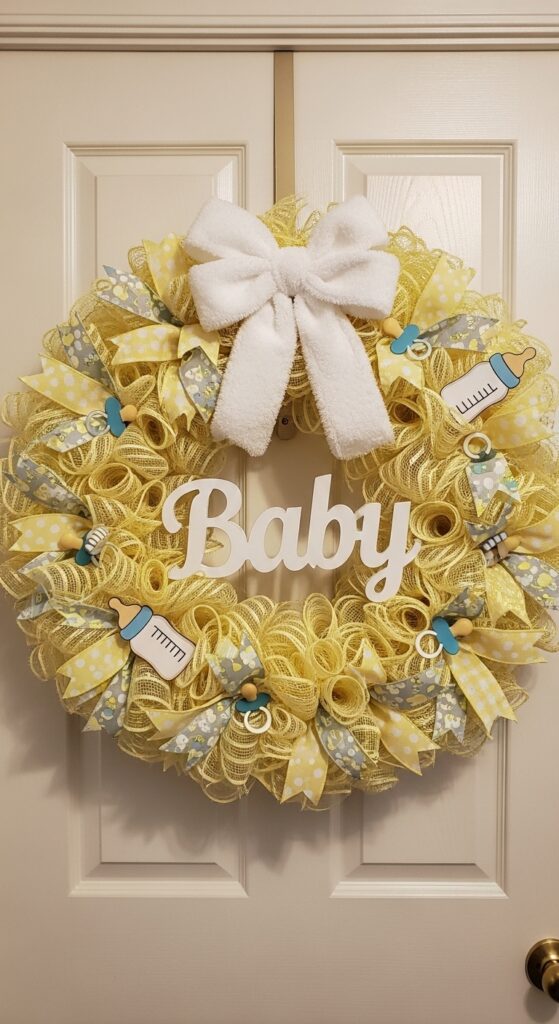
Colors: Soft yellow and white for gender-neutral; pale blue or soft pink for gender-specific
Ribbon: White satin wired ribbon bow with long streamers, or color-matched ribbon
Embellishments: Baby bottle picks, pacifier charms, “Baby” letter sign, star picks
Construction note: For a gender reveal presentation, make two smaller wreaths (12-inch frames) rather than one large one — they hang together as a pair with a question mark sign between them, which reads more clearly as a reveal moment than a single mixed-color wreath. The paired format also photographs better for social media sharing.
20. Wildflower Meadow Wreath — Free-Spirited, Colorful and Garden-Wild
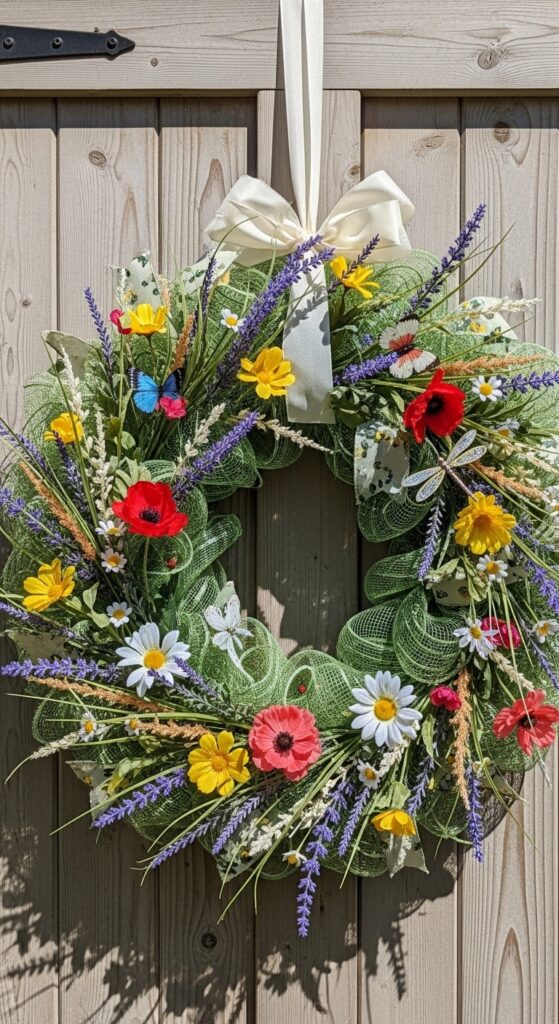
Colors: Grass green or soft sage mesh as a natural background
Ribbon: Simple ivory or pale yellow wired ribbon — understated to let florals dominate
Embellishments: Faux wildflowers in multiple colors (lavender, yellow, red poppy, white daisy, coral cosmos), butterfly picks, dried grasses, dragonfly ornaments
Construction note: The defining quality of this style is intentional irregularity — flowers at different angles, different heights, different stem depths. The crafted version of this style looks staged; the successful version looks gathered. Resist the urge to space flowers evenly or create symmetrical arrangements. Insert stems at varied angles, let some flowers face sideways, and allow the arrangement to spill slightly past the wreath edge.
FAQs: Expert Deco Mesh Wreath Styling
Conclusion:
A deco mesh wreath is one of the most immediately satisfying DIY projects you can undertake — the transformation from bare wire frame to something genuinely beautiful happens within a single afternoon. The technique has a learning curve, but it is a short one: most people find that their second wreath is dramatically better than their first simply from having worked through the process once.
The 20 ideas in this guide represent a range of styles, seasons, and skill levels, but they share the same underlying structure. Once you can make one well, you can make all of them. Adjust the colors, change the embellishments, shift the ribbon choice — the wreath changes completely while the technique stays constant.
Start with one idea that genuinely excites you. Use the material and construction notes specific to that design rather than improvising them. Hang it before the final fluffing. Then step back and look at what you made.
It is better than you expected. It always is.
1 thought on “Deco Mesh Wreath Step By Step Guide for Stunning Home Decor”