
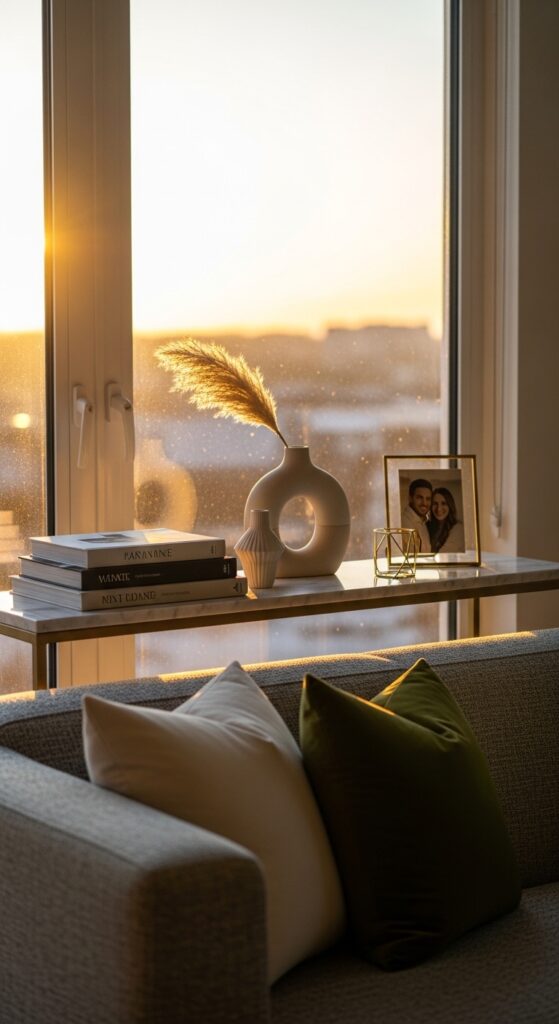
I’ll be honest with you: I ruined a dinner party because of a kitchen counter.
It was my second year in a 480-square-foot studio in the city. I had the guest list, the playlist, and even a charcuterie board I’d practiced twice. But when the first guest asked for a gin and tonic, I found myself navigating around a dish rack, a coffee maker, and three days worth of mail just to reach the bottles I’d stashed behind the microwave. The “bar” was a corner of the kitchen counter, and it showed.
That night I made a decision: I was going to build a proper drink station, even if I only had a 3-foot wall and a $60 budget to do it.
What I learned over the next few years of experimenting—and yes, failing—is that a tiny home bar is less about furniture and more about intentional space planning. You don’t need a basement rec room or a mahogany cabinet the size of a refrigerator. You need one good idea, executed well.
This guide is the result of that journey. Each idea below comes with real setup notes, so you’re not just looking at pretty pictures—you’re getting the actual how-to.
Why a Dedicated Bar Space Changes Your Home (Even If It’s Tiny)
Before we dive into the ideas, here’s something worth understanding: a bar “zone” works psychologically even at small scale. When you have a designated spot—even just a tray on a shelf—your brain registers it as a place of transition. End of workday, walk to the bar, make a drink. The ritual matters more than the real estate.
Interior designers call this activity zoning: carving a room into distinct functional areas so that a studio apartment doesn’t feel like one big, ambiguous box. A tiny bar is one of the easiest and most affordable ways to create that kind of structure without knocking down walls.
25 Ingenious Tiny Bar Ideas for Cozy Spaces
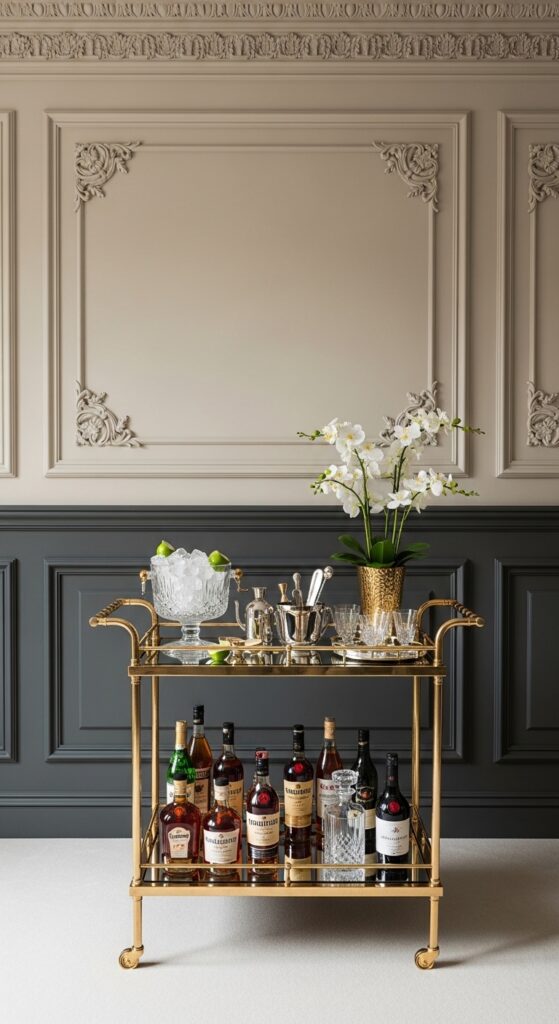
1. The Rolling Bar Cart — The Starter’s Best Friend
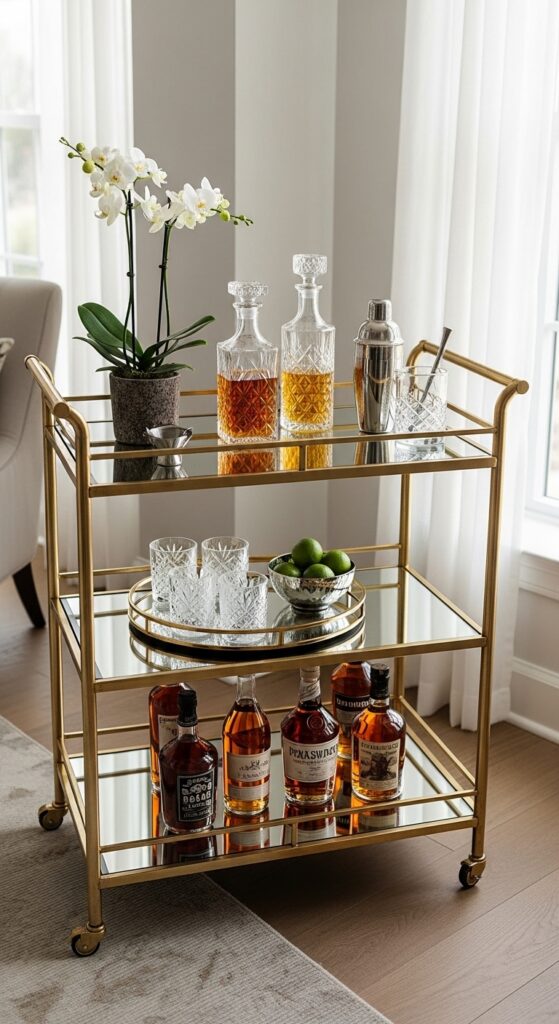
A bar cart is the first piece of advice I give anyone with a small space because it costs nothing in terms of permanent commitment. You can move it, style it, or stash it in a closet if you need the square footage back.
What actually works: Look for a two-tier cart with a metal frame—brass, matte black, or chrome all hold up well. Avoid carts with wicker or fabric shelves; spills are inevitable. The lower tier handles heavier bottles; reserve the top for your active mixing tools (shaker, jigger, strainer) and one or two display decanters.
Setup note: Place a small non-slip mat on each shelf before loading. Bottles on wheels can shift and tip when you roll the cart. A mirrored or glass surface on the top tier will reflect ambient light and make even a dark corner feel more open.
Best for: Renters, multi-functional rooms, anyone not ready to commit to a permanent setup.
2. The Bookshelf Bar — The Sneaky Multi-Tasker
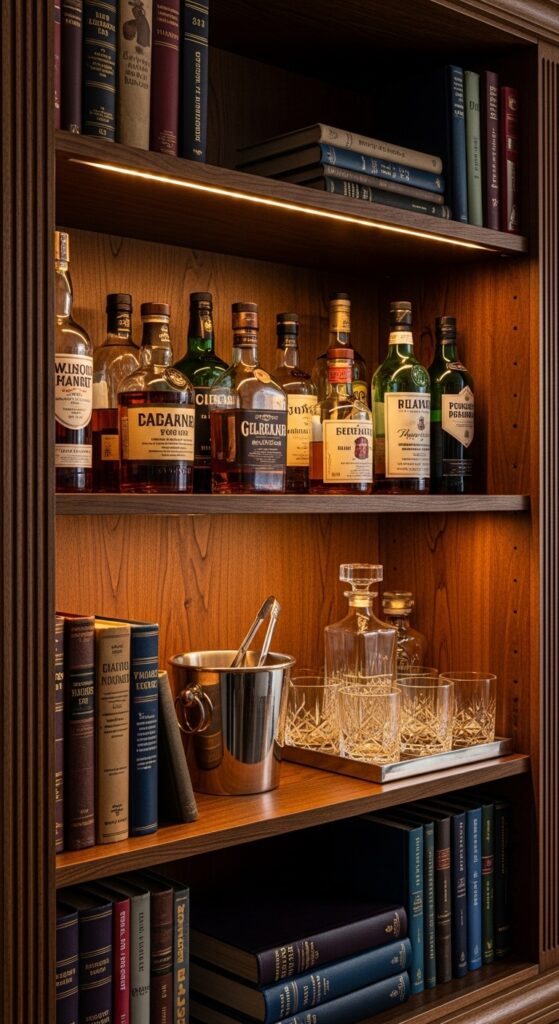
The narrow IKEA Billy bookshelf (or any equivalent) is probably the most underrated bar cabinet available. At around 11 inches deep, it fits flush against almost any wall and disappears into a room as “just another bookshelf.”
What actually works: Clear out two consecutive middle shelves. The lower of the two becomes your working surface—place a thin cutting board or a small tray here for prep. The shelf directly above it stores your most-used bottles within easy reach. Upper shelves handle glassware; lower shelves hold backup stock, mixers, or books you actually read.
Setup note: The Billy’s standard shelf depth (11 inches) fits a standard 750ml bottle perfectly, but a magnum (1.75L) will overhang slightly—keep those on the floor beside the unit. Add shelf liner to prevent glass sliding.
Best for: People who want the bar to blend into existing decor without looking like a bar.
3. The Murphy Bar — Maximum Functionality, Zero Footprint
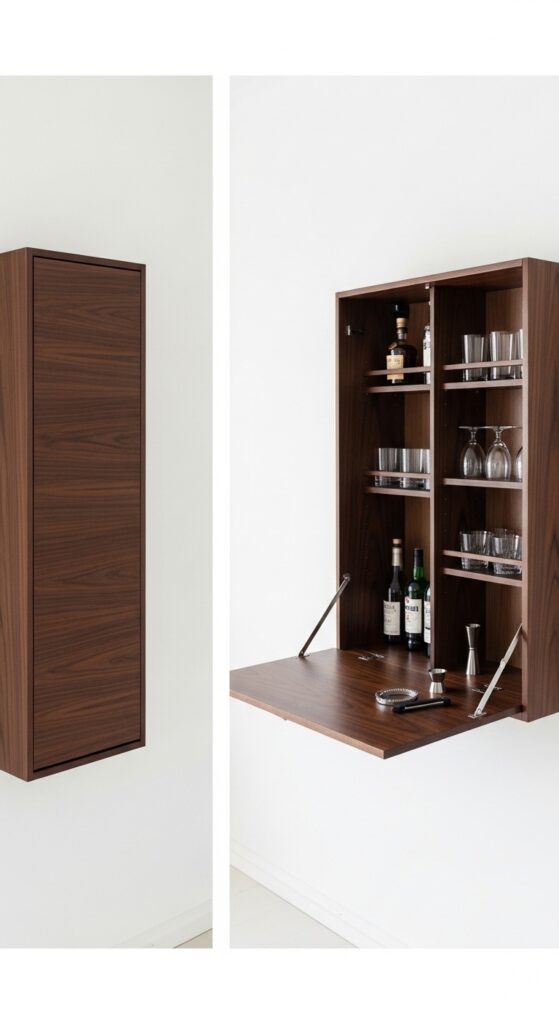
A wall-mounted drop-down bar is essentially a Murphy bed for your liquor cabinet. When closed, it looks like a plain cabinet or framed panel on the wall. Flip it open, and the door becomes a mixing surface.
What actually works: Pre-built Murphy bar kits exist (search “fold-down bar cabinet”), but a skilled DIYer can build one with a piano hinge, a 3/4-inch plywood door, and two support chains to hold it level when open. The interior of the cabinet needs to be shallow (8–10 inches) to keep the unit’s weight manageable.
Setup note: This is the one idea on this list that genuinely requires wall anchoring into studs—not just drywall anchors. A loaded bar cabinet can weigh 30–40 pounds; if it pulls away from the wall, it will take your bottles with it. Use a stud finder before installation, or hire someone for the mounting step only.
Best for: Small hallways, home offices, spaces where the bar must disappear completely when not in use.
4. The Rustic Corner Cabinet — Warmth Over Minimalism

Not every small home bar needs to be sleek and modern. If your space leans toward warm tones, natural materials, and lived-in texture, a small distressed wood cabinet in a corner can anchor a room beautifully.
What actually works: Look for a piece with at least one open shelf (for display) and one closed cabinet (for backup bottles and supplies you don’t want visible). A cabinet around 30–36 inches tall fits neatly into most corner spaces without hitting light switches or outlets.
Setup note: The “rustic” look can tip into cluttered easily. Limit your display surface to three to five items—a decanter, two glasses, one small plant or candle. Everything else goes inside the cabinet. The restraint is what makes the look work.
Best for: Living rooms, sunrooms, or any space with warm wood tones, exposed brick, or earthy decor.
5.Floating Shelves — The Purist’s Choice
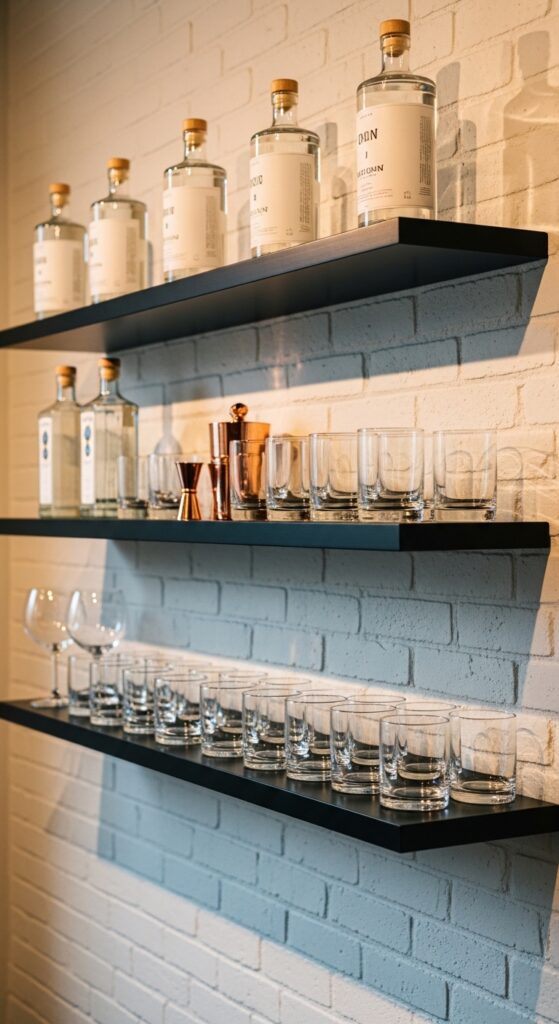
Three floating shelves and a stud finder. That’s genuinely all you need for one of the cleanest, most scalable tiny bar setups available.
What actually works: Install the bottom shelf at 36–38 inches from the floor (standard bar height). This becomes your prep surface. The middle shelf, 12–14 inches above it, holds your most-used bottles. The top shelf, another 10–12 inches up, is for glassware—inverted, so dust doesn’t collect inside.
Setup note: Shelf depth matters more than most people realize. A 10-inch shelf holds standard bottles but not a cocktail shaker lying on its side—go to 12 inches if budget allows. For a polished look, use the same shelf style throughout and keep the wall color consistent. The bottles and glasses should be the visual interest, not the shelves themselves.
Best for: Minimalists, renters who can patch small holes on move-out, anyone who wants the bar to feel like architecture rather than furniture.
6. Under-the-Stairs Bar — The Hidden Goldmine
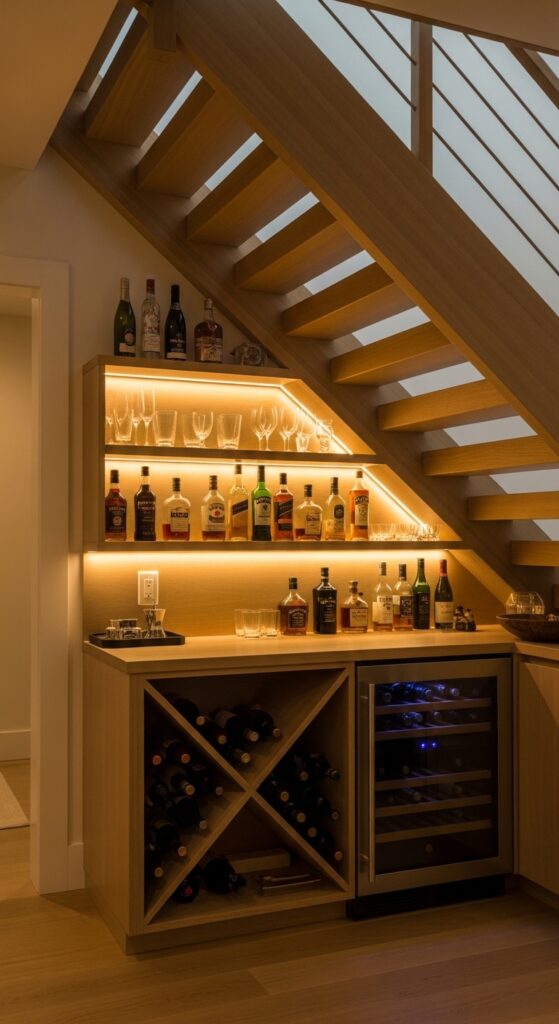
If you have a staircase with an enclosed triangular space underneath, you are sitting on the best “free” square footage in your home. Most people use it for vacuum cleaners and mystery boxes. A tiny bar here becomes a genuine showpiece.
What actually works: Measure the height at the tallest point of the nook and work backward. If you have 60+ inches at the peak, you can stand a full bar cabinet upright. Under 48 inches, you’re looking at a crouching setup—better suited to wine storage and a pull-out surface than active mixing.
Setup note: This space almost always needs lighting—it’s dark by nature. LED strip lights along the inside ceiling edge are the cheapest solution. Warm white (2700K–3000K) gives the space a cozy glow; cool white makes it feel like a storage closet. Don’t skip the light; it’s what transforms this from “stuff under the stairs” to “feature of the home.”
Best for: Townhouses, multi-level apartments, homes where the under-stair space is currently wasted.
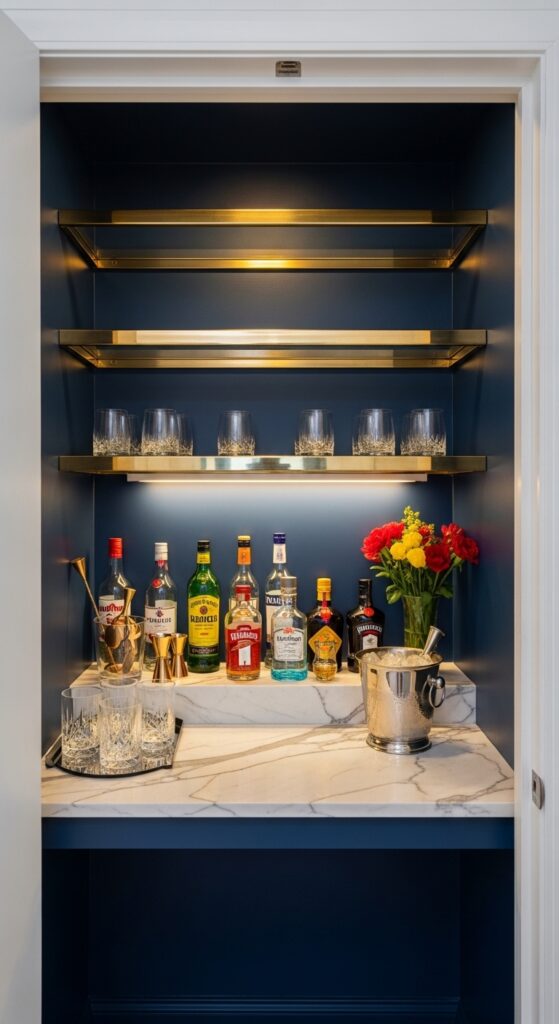
7. The Closet Conversion — From Storage to Speakeasy
A small reach-in closet with the door removed is one of the most satisfying bar transformations possible. Because three walls already exist, you’re essentially getting a built-in bar for the cost of paint and some shelving hardware.
What actually works: Remove the door (or replace it with a curtain rod and heavy linen curtain for a soft look). Paint the interior a bold, saturated color—navy, forest green, deep burgundy—that contrasts with the surrounding walls. Install a small piece of butcher block or a marble slab as a countertop if the existing shelf isn’t at the right height. Add a wine fridge below if the closet depth allows (most reach-in closets are 24 inches deep—enough for a 15-inch wine fridge with room for a small step stool).
Setup note: The bold interior color is non-negotiable for this look. A white-painted closet interior reads as an unfinished project. The contrast is what creates the “frame” effect that makes it look deliberate and designed.
Best for: Apartments with spare closets, renters willing to repaint on move-out, anyone who wants a dramatic bar without construction costs.
8. Floating Loft Bar Extension
In a loft or mezzanine-style apartment, the railing along the upper level edge is often just a safety feature—but it can double as a bar top with minimal modification.
What actually works: A 10–12 inch wood plank, finished with polyurethane and brackets, can be secured to the interior-facing side of the railing. Keep it clear of the railing’s structural hardware and don’t overload it—this is a display and light-use surface, not a heavy-duty prep station.
Setup note: Check your lease before drilling into any railing. Some buildings consider railings structural elements. Clamp-on brackets exist as a no-drill alternative for this exact situation.
Best for: Loft apartments, converted warehouse spaces, anywhere with an upper-level overlook.
9. The Vintage Suitcase Stand
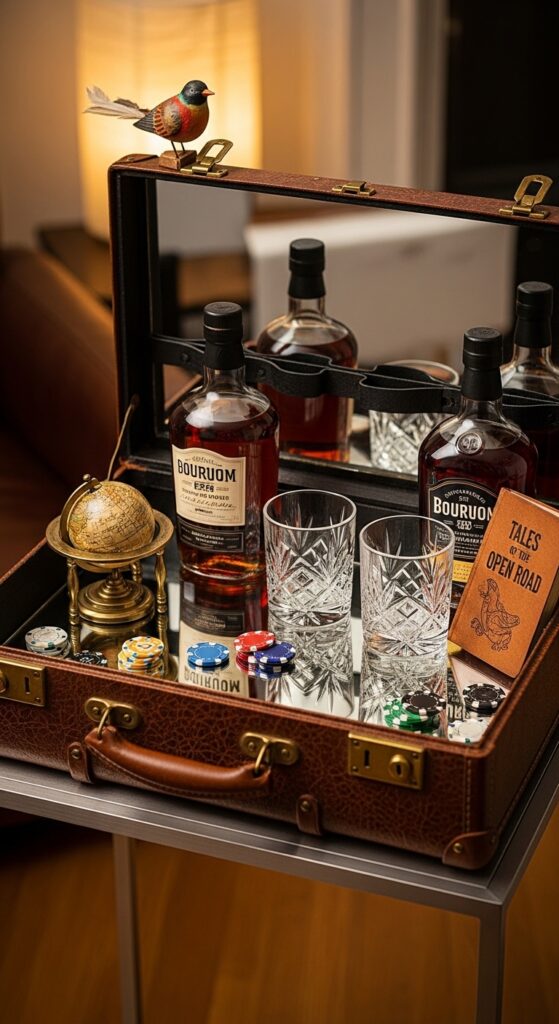
This is the most conversation-starting option on the list, and it costs next to nothing if you find the right piece.
What actually works: You want a hard-shell suitcase—vintage Samsonite or any rigid-sided piece from a thrift store. The exterior needs to close flat (no broken latches or warped sides). Prop it open on a luggage rack or a simple folding stand. Line the bottom half with a mirrored or acrylic tray to protect the interior and make cleanup easy. The lid interior can hold a corkscrew, bottle opener, and cocktail napkins with small adhesive hooks.
Setup note: Hard-shell suitcases from the 1960s–70s are genuinely sturdy and available for $15–$40 at most thrift stores. Avoid soft-sided luggage—it won’t hold the shape. Look for pieces with a flat, clean interior rather than padded dividers, which are harder to clean after spills.
Best for: Guest rooms, home offices, first apartments where budget is tight but style still matters.
10. The Mirrored Corner Cabinet
A tall, slender corner cabinet solves two problems simultaneously: it stores a full bar’s worth of supplies and occupies the room’s “dead zone”—the corner where no normal furniture fits comfortably.
What actually works: Look for a piece 60–70 inches tall with glass-front doors on the upper section (for display) and solid doors on the lower section (for storage). The glass upper section benefits from interior cabinet lighting—a small battery-powered LED puck light on the top interior shelf will illuminate your glassware beautifully.
Setup note: Measure your corner carefully before buying. True corner cabinets are designed to fit at 90 degrees, but some corners are slightly off due to wall imperfections. Buy adjustable leg levelers if the floor is uneven.
Best for: Dining rooms, living rooms with open corners, anyone who wants significant storage without a large floor footprint.
11. Industrial Pipe Shelving
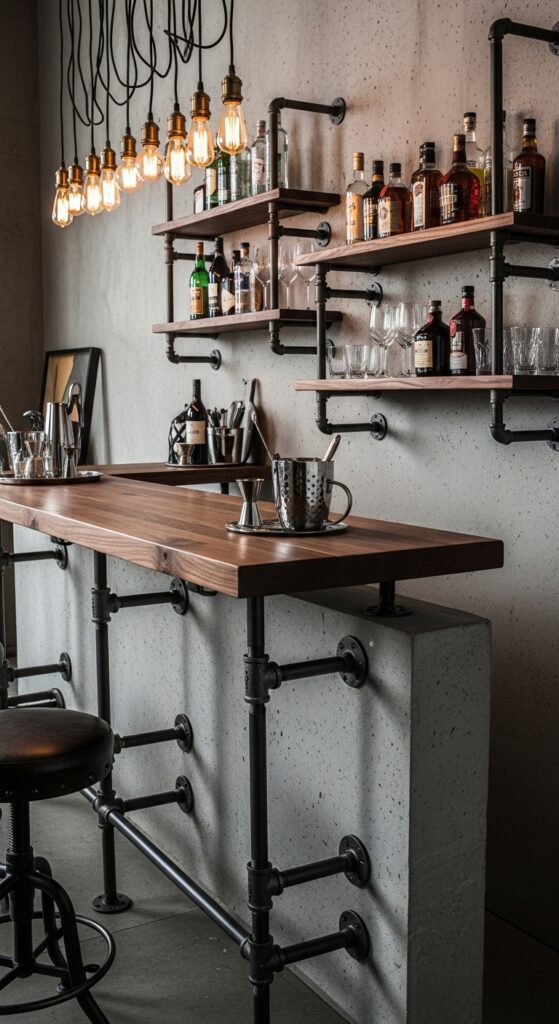
Black iron pipe shelves are a genuine DIY project that looks expensive and costs far less than custom cabinetry. They’re also infinitely customizable—you build exactly the dimensions you need, which is valuable in awkward spaces.
What actually works: A standard setup uses 3/4-inch black iron pipe fittings (floor flanges, nipples, elbows) available at any hardware store, combined with reclaimed wood or a pre-cut pine board. The pipes screw into wall studs via the flanges. Two pipes per shelf, 16–24 inches apart, provides adequate support for bottles.
Setup note: The DIY risk here is wood selection. Avoid cheap pine boards—they bow under weight over time. Go with 3/4-inch birch plywood (more stable) or true reclaimed wood (heavier but beautiful). Finish with two coats of polyurethane, especially on the surface where bottles will sit. The iron pipes don’t require finishing—the raw look is the point—but a quick wipe-down with linseed oil prevents surface rust in humid climates.
Best for: Modern industrial spaces, basement bars, anyone comfortable with basic DIY tools.
12. The Window-Side Bistro Bar
A narrow console table—the kind typically placed behind a sofa—functions perfectly as a bar surface against a window or along an unused wall.
What actually works: Console tables are usually 12–15 inches deep, which is enough for a tray of bottles but not a full mixing setup. Solve this with a wall-mounted shelf directly above it at 18–20 inches height, adding a second tier. The console’s lower shelf or any drawers handle backup bottles, mixers, and tools.
Setup note: Lighting matters here more than with most setups. A console table bar along a wall without ambient light looks flat. A small table lamp on one end (placed on a riser so it clears the bottles) or a wall sconce directly above transforms the look from “stuff on a table” to an intentional vignette.
Best for: Living rooms, dining rooms, any wall with unused horizontal space.
13. The Chic Playroom-Adjacent Bar
In homes with young children, the bar needs to be accessible to adults and inaccessible to kids—simultaneously. A tall cabinet with a key lock or a childproof latch on the upper section solves this without banishing the bar to a locked room.
What actually works: A standard wardrobe-height cabinet (72+ inches) with upper shelves dedicated to bar use keeps bottles out of reach. The lock isn’t primarily about security—it’s about peace of mind. A simple push-button cabinet lock (under $10) does the job.
Setup note: Don’t rely on height alone. Children who are determined climbers will use lower drawers as steps. If this is a genuine concern, the push-button childproof latch on the upper cabinet door is a fast, non-destructive addition to any piece of furniture.
Best for: Family rooms, homes with children ages 2–8, shared living spaces.
14. Sophisticated Wall Molding Backdrop
This idea costs almost nothing and creates the single most dramatic visual upgrade possible for an existing bar cart or shelf setup.
What actually works: Apply simple panel molding (available at any home improvement store for $2–$5 per 8-foot length) to the wall directly behind your bar in a grid or frame pattern. Paint the molding and the wall within the “frames” a slightly different finish—eggshell vs. flat, or a tone slightly lighter or darker than the surrounding wall. The result is a built-in architectural detail that makes even a $50 bar cart look like it belongs in a hotel lobby.
Setup note: This is the one idea where the execution precision matters most. Use a level on every horizontal molding piece. Off-by-half-an-inch is visible from across the room. A laser level (or even a long spirit level) makes this a one-person job instead of a two-person argument.
Best for: Rental spaces where painting is allowed, anyone wanting a high-end look without a high-end budget.
15. The Marble-Top Washstand
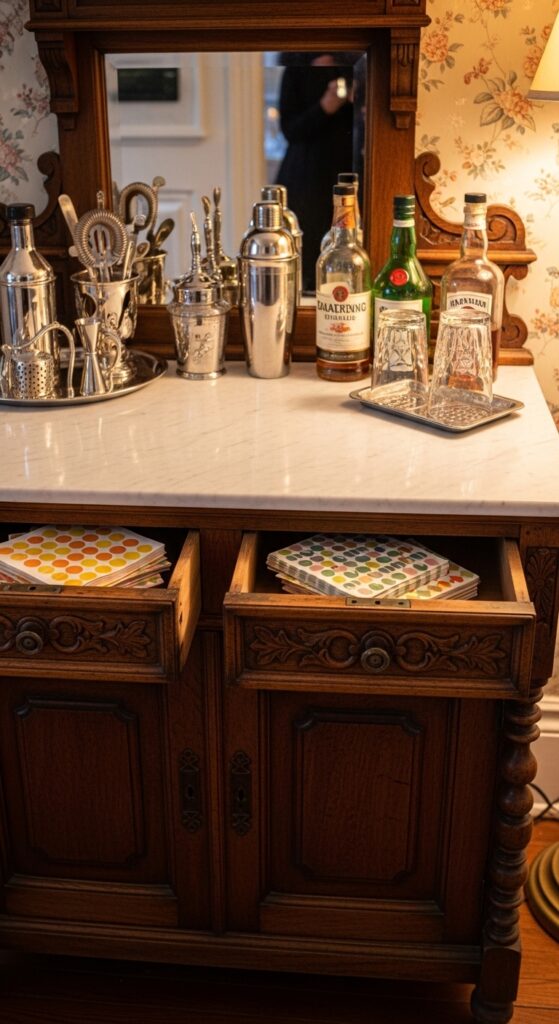
Old bathroom washstands are the kind of furniture that sits in antique markets for months because buyers don’t know what to do with them. You do: add a marble slab and call it a bar.
What actually works: Look for a washstand with a lower shelf or cabinet and a clear, flat top surface. Have a piece of marble or quartz cut to size at a stone yard (often cheaper than buying a pre-cut slab retail). Secure it with construction adhesive. The drawers hold napkins, stirrers, small tools, and bitters bottles.
Setup note: “Marble” isn’t one material—it’s a spectrum. Calacatta and Carrara are beautiful but porous and stain easily (red wine and citrus are enemies). For a bar surface, ask specifically for honed (matte) marble with a penetrating sealer already applied, or consider engineered quartz instead—it looks nearly identical, costs less, and is essentially impervious to stains.
Best for: Eclectic, vintage, or maximalist interiors. Homes that already have antique or repurposed furniture.
16. The Mirrored Tray on a Credenza

Before buying any new furniture: look at what you already own.
A sideboard, credenza, or buffet table can become an instant bar station with nothing more than a large decorative tray. The tray creates a visual boundary—it says “this corner is intentional” to any eye that lands on it.
What actually works: The tray should be large enough to hold 4–6 bottles plus your most-used tools without crowding. Rectangular trays work better than round ones for this purpose—they make more efficient use of surface space. Place the tallest bottles at the back of the tray, shorter ones in front, and tools (shaker, strainer) in front of those.
Setup note: The mistake people make here is choosing a tray that’s too small. A small tray holding many bottles looks crowded and accidental. A large tray holding six bottles and two glasses looks curated. When in doubt, go one size larger than you think you need.
Best for: Anyone who already owns a sideboard or credenza. The fastest and cheapest upgrade on this list.
17. The Vertical Wine Grid
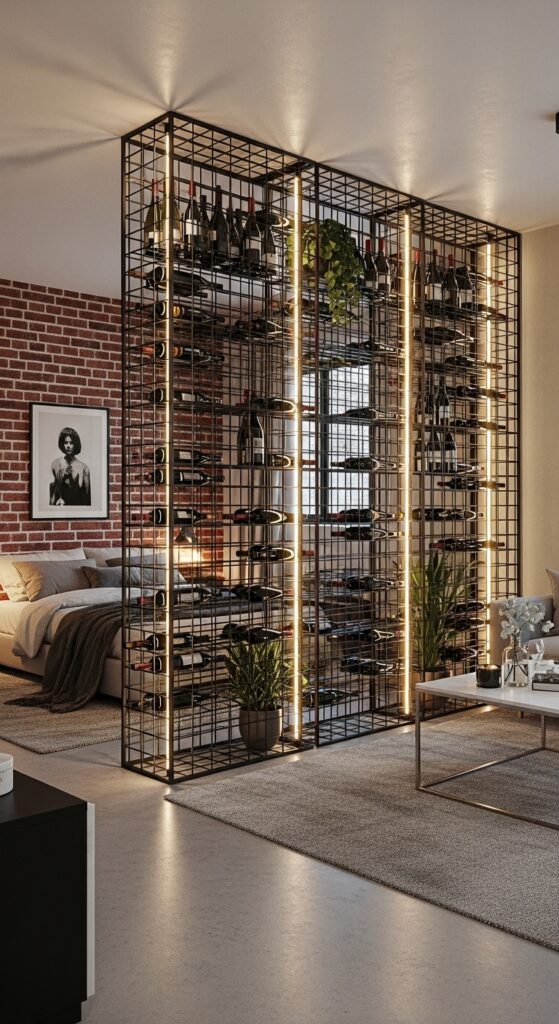
A floor-to-ceiling wine rack does something unusual: it functions as both storage and architecture. A wire or wooden grid that runs from floor to ceiling along one wall becomes a visual element as much as a functional one.
What actually works: Metal wire grids are the most practical—they’re lightweight, inexpensive, and allow bottles to be visible from both sides if used as a room divider. Wood grids (square cubby style) look more architectural but require proper anchoring at the top and bottom to prevent racking under weight.
Setup note: Don’t store wine in direct sunlight, near a heat vent, or against an exterior wall in cold climates. These are the three most common wine-storage mistakes in home setups. The ideal location is an interior wall with minimal temperature fluctuation—the back of a living room, a hallway, or the far wall of a dining area.
Best for: Wine collectors, open-concept studios that need soft room division, modern or industrial-style homes.
18. The Color-Coded Bottle Display
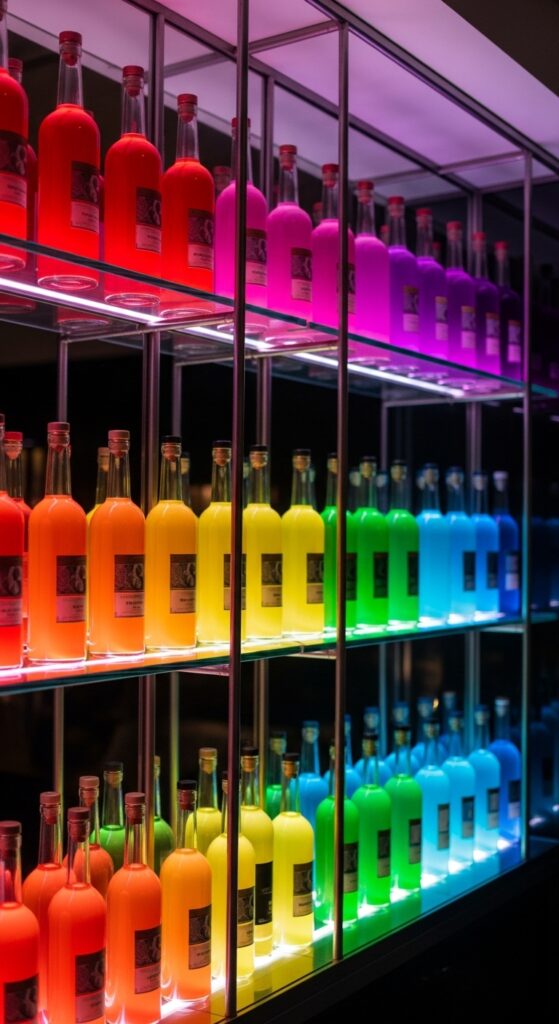
This is as much a styling technique as a structural idea, and it’s the easiest way to make a modest collection of 8–12 bottles look like an intentional art display.
What actually works: Group your bottles by the color of the liquid: clear spirits (vodka, gin, white rum) together; amber spirits (whiskey, dark rum, aged brandy) together; cordials and liqueurs by their own colors. This creates a gradient or color-block effect that the eye reads as intentional composition rather than accumulation.
Setup note: This only works with clear glass shelves or no shelves at all—solid wood or painted shelves interrupt the color logic. Remove labels from bottles you’ve transferred to decanters for an even cleaner look. Keep one “character” bottle (a distinctive shaped bottle you love) as an anchor in each color group.
Best for: People who love visual design, small collections that need to look deliberately styled, bars on open shelving.
19. The Hidden Pantry Bar

If you have a kitchen pantry with a door, you already have a bar. You just haven’t unlocked it yet.
What actually works: Dedicate one full shelf at eye level (roughly 60–66 inches from the floor) to bar use exclusively. Keep it entirely clear of food items—the mental separation is important. When entertaining, leave the pantry door open; the effect is an interior reveal, almost like a back bar in a restaurant.
Setup note: Pantry shelves are often wire or cheap laminate—neither handles the condensation from cocktail shakers well. Add a waterproof tray or a piece of cut-to-size vinyl shelf liner. Wipe down regularly; spills behind closed doors go unnoticed and become permanent stains.
Best for: People who want the bar hidden entirely during daily life but visible and accessible when entertaining.
20. The Mid-Century Modern Sideboard
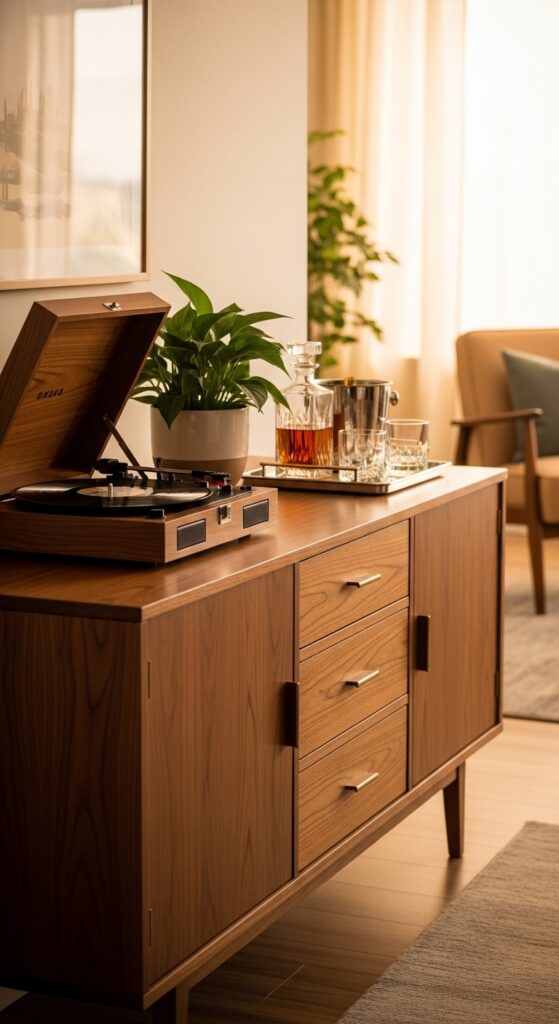
An MCM sideboard is practically designed to be a home bar. The low, horizontal profile, tapered legs, and combination of open-top surface with closed-cabinet storage below hits all the right notes for a small-space bar setup.
What actually works: The top surface of an MCM sideboard is typically 18–20 inches deep—enough for a tray of display bottles plus a decorative object (lamp, plant, framed artwork). The closed lower cabinets handle the “working” stock: backup bottles, a cocktail recipe book, less attractive mixers in their original packaging.
Setup note: Tapered MCM legs are the piece’s visual signature—don’t cover them with anything. Keep the area under the sideboard clear; the negative space under the furniture is what makes the piece look light and airy rather than heavy. If you’re buying secondhand, check the leg attachment points; MCM legs were often secured with simple screws into a corner block, and these can loosen over decades.
Best for: Mid-century, Scandinavian, or modern-organic interiors. Anyone looking for a sideboard that doubles as a bar without looking like one.
21. The Acrylic “Ghost” Bar
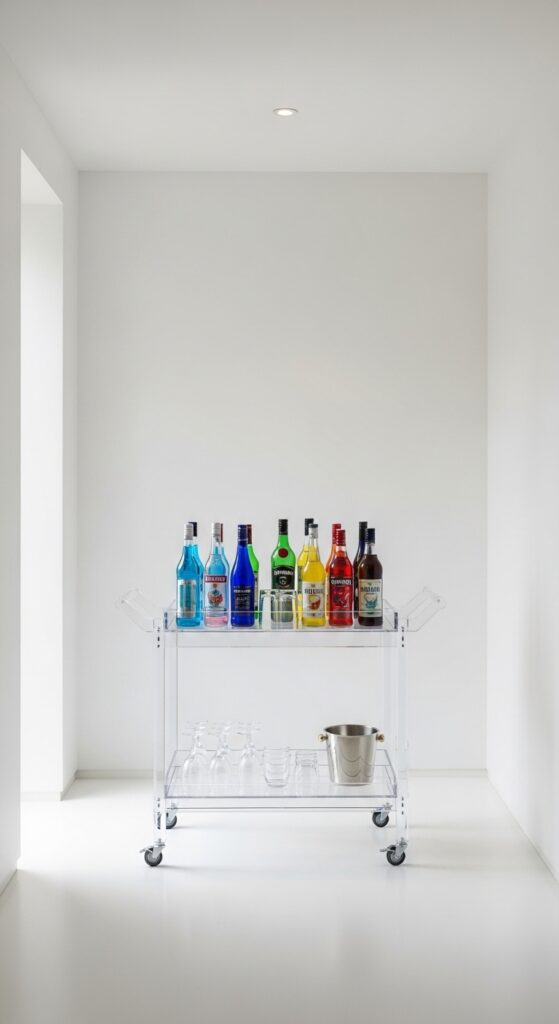
Acrylic (sometimes called Lucite or Plexiglass depending on the brand) is transparent, which means it contributes zero visual weight to a room. An acrylic bar cart in a small apartment is effectively invisible—you see the bottles and glasses, not the cart itself.
What actually works: Acrylic carts range from $60 (thin, flexible, prone to cracking) to $400+ (thick, solid, genuinely durable). The cheap ones wobble, scratch easily, and look cheap once scratched. Mid-range acrylic (3/8-inch or thicker panels) hits the right balance. Look for pieces where the panels are glued rather than slotted—they hold up better under daily use.
Setup note: Clean acrylic only with mild soap and water or a product specifically labeled safe for plastics. Never use Windex (ammonia-based) or abrasive cloths—they create micro-scratches that cloud the material permanently. A cloudy acrylic cart defeats the entire purpose.
Best for: Very small rooms where any visual bulk would be overwhelming, ultra-modern or minimalist interiors, anyone who wants the bar to read as transparent.
22. The Garden-Inspired Green Bar
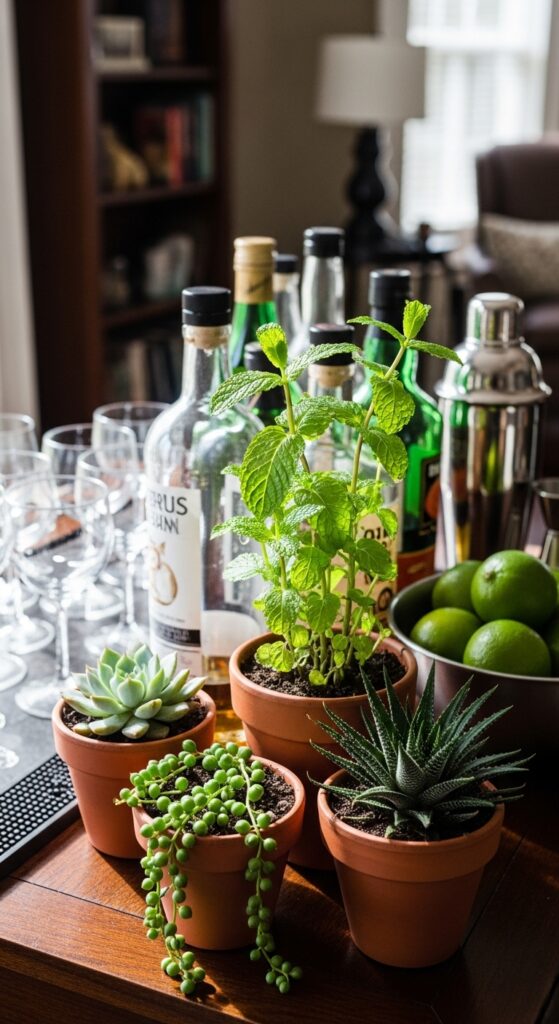
Incorporating live plants into a bar setup is less about aesthetics (though it looks great) and more about functionality—if you grow the right plants, you’re growing your garnishes.
What actually works: Mint is the obvious choice (mojitos, mint juleps, dozens of gin drinks), but also consider: basil for infused gin cocktails, rosemary for smoky drinks and garnish, thyme for lemonade spritzers. Small 4-inch pots fit on a standard bar shelf without dominating it.
Setup note: Fresh herbs at bar level need more light than most interiors provide. If your bar is not in a naturally bright spot, a small grow light (clip-on, available for under $20) placed above the plant shelf solves this. Without adequate light, herbs get leggy and pale within two weeks. A grow light keeps them compact, healthy, and actually harvestable.
Best for: Natural, biophilic, or eclectic interiors. Anyone who regularly makes herb-forward cocktails or mocktails.
23. The Gold-Leafed Niche
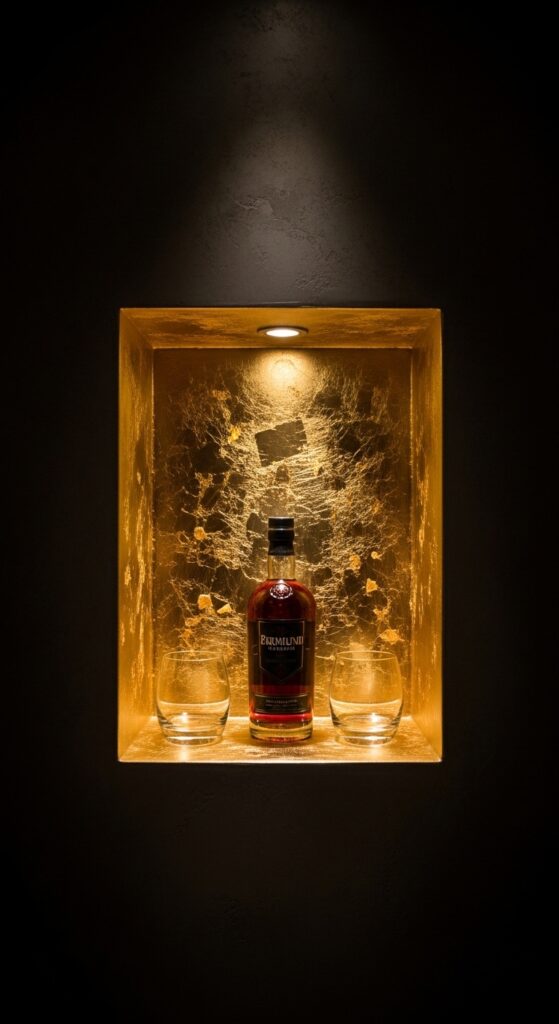
Recessed niches—those small, intentional cutouts built into some walls for decorative objects—are frequently underused. A niche that currently holds one sad candle can hold an entire small bar vignette.
What actually works: Line the back wall of the niche with metallic wallpaper, gold leaf sheets (real or imitation), or mirror tile. Install one small spotlight or a battery-operated puck light above. A niche 12 inches wide × 18 inches tall × 6 inches deep can hold two decanters and two glasses with room to spare.
Setup note: Imitation gold leaf (composition leaf, usually copper-zinc alloy) is far cheaper than real gold leaf and looks nearly identical on an interior wall. Apply it with gilding size (an adhesive varnish) and seal with a clear matte varnish. The varnish step is essential—unsealed composition leaf tarnishes within months in humid conditions.
Best for: Homes that already have architectural niches, anyone wanting a dramatic bar focal point with literally zero floor space impact.
24. The Bamboo Tiki Station
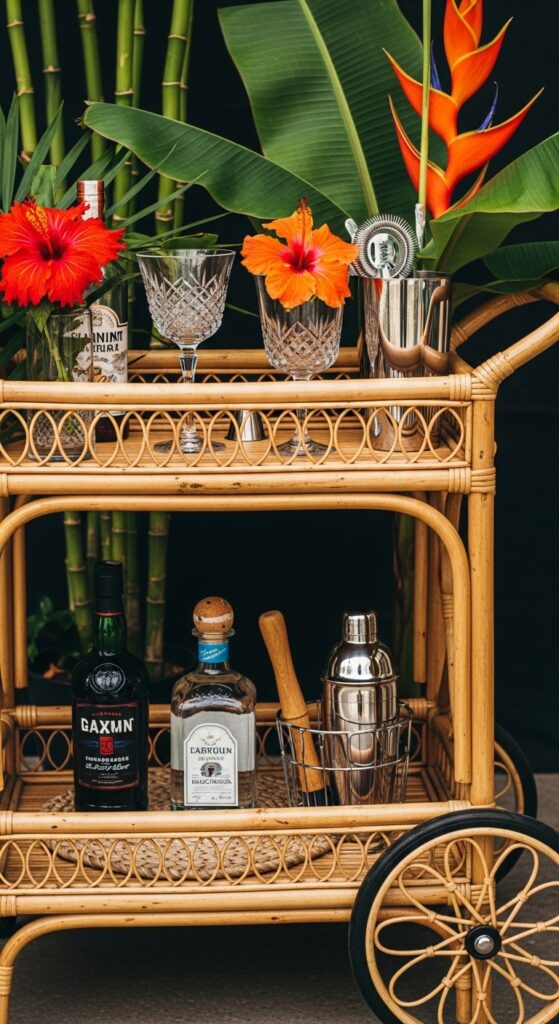
A bamboo or rattan bar cart brings a specific energy—relaxed, sun-warmed, deliberately un-serious—that genuinely transforms the mood of a room.
What actually works: Natural bamboo carts are available in the $80–$200 range. Pair them with short, colorful glassware (tiki mugs, coupes in warm colors, vintage highball glasses with a pattern). Keep a small bowl of whole limes and oranges on the top shelf—they’re both garnishes and decor.
Setup note: Natural bamboo in humid climates (or near a sink) can develop mold on the interior joints where moisture collects. Seal a new bamboo cart with a clear outdoor polyurethane before first use, paying special attention to the shelf surfaces and joint areas. This takes 20 minutes and extends the cart’s life by years.
Best for: Sunrooms, enclosed porches, tropical or relaxed-eclectic interiors, anyone who wants the bar to feel like a vacation.
25. The Library Ladder Bar
If you have ceilings over 9 feet and a wall of built-in or freestanding shelves, the upper third of that shelf space is almost certainly dead storage. A rolling library ladder changes the math.
What actually works: Dedicate the top two shelf levels (typically above 72 inches from the floor) to your bar. This keeps bottles out of daily living space and turns retrieval into a minor event—which is actually part of the appeal. A rolling ladder on a track is the full experience; a fixed library step stool accomplishes the same thing at lower cost.
Setup note: The library bar only works if the shelves at that height are genuinely accessible—not just technically reachable. A three-step ladder is fine. Anything requiring more than four steps to reach a standard bottle is a practical failure regardless of how it looks. Test the reach before committing the space.
Best for: Homes with high ceilings and built-in shelving, library-style home offices, classic or old-world interior styles.
Troubleshooting the Most Common Tiny Bar Problems
Problem: My bar always looks cluttered, no matter what I do. The issue is almost never the number of items—it’s the lack of a containing element. Add a tray. Every item on the tray looks curated; items outside the tray look like clutter. If the tray alone doesn’t solve it, remove the three items you use least frequently and store them in a cabinet.
Problem: My bottles keep getting dusty. Open shelving creates this problem. Solutions in order of effectiveness: add glass doors, move the bar to a closed cabinet, or commit to a weekly 5-minute wipe-down (use a barely damp cloth on bottles before guests arrive).
Problem: My small apartment gets warm and I’m worried about spirit quality. Heat is actually less damaging to spirits than people fear for short-term storage. Whiskey, gin, vodka, and rum are stable at room temperature for months to years. The real enemies are direct sunlight (which can fade color and alter flavor over time) and dramatic temperature swings (which expand and contract the liquid against the cork). Keep bottles away from windows and radiators.
Problem: I don’t have any dedicated space, period. Start with a single shelf on an existing bookcase and one tray. This is not a compromise—it’s a legitimate bar setup for a one- or two-bottle collection. Expand when you have the space, not before. A single well-styled shelf always looks better than an overloaded cart.
Problem: My bar cart rolls around when I don’t want it to. All four wheels should have individual locks; most decent carts include these. If yours doesn’t, rubber caster cups (small rubber rings placed under each wheel) prevent rolling on hard floors without requiring you to engage a lock every time.
What You Actually Need to Stock a Compact Bar
You don’t need 40 bottles to have a functional bar. Here is a realistic progression:
The 3-bottle starter (fits on a tray): One clear spirit (vodka or gin), one dark spirit (whiskey or rum), one bottle of vermouth. With these three, you can make a martini, a Manhattan, a gin and tonic, a whiskey sour, and a dozen variations.
The 6-bottle capable bar: Add bitters (Angostura, a bottle the size of your thumb), a citrus liqueur (Cointreau or triple sec), and one amaro or aperitivo. You now cover most classic cocktail categories.
The 12-bottle enthusiast bar: Fill in gaps based on what you actually drink: a second whiskey, a mezcal, a bottle of Campari for Negronis, sparkling wine for spritzes.
Glassware minimum: Two rocks glasses and two highball glasses cover 90% of drinks. A couple of coupes adds cocktail capability. You don’t need matching sets—intentional mix-and-match often looks better in small spaces than a uniform set of six identical glasses.
FAQs: Styling a Tiny Bar in Small Spaces
Conclusion: Final Words on Tiny Bar Living
The bars I’ve seen that work best in small spaces all share one quality: they’re specific. Not “a collection of bottles on a shelf” but “this particular corner, styled with intention, serving a clear purpose.”
You don’t need more space. You need one idea that fits your space, executed properly.
Pick one idea from this list—just one—and spend a weekend setting it up properly: the tray, the light, the right number of bottles. Once that corner is done, you’ll understand what I mean. The room changes. The ritual changes. And the next dinner party will go considerably better than mine.
1 thought on “25 Best Tiny Bar Ideas for Cozy Spaces”